
Are you a crypto enthusiast looking to add Shiba to your Metamask wallet? Look no further! In this step-by-step guide, we will walk you through the process of adding Shiba to your Metamask wallet, allowing you to easily manage and trade this popular cryptocurrency.
Step 1: Download and Install Metamask
The first step is to download and install the Metamask extension for your preferred web browser. Metamask is a cryptocurrency wallet and a browser extension that allows you to interact with decentralized applications (DApps) on the Ethereum blockchain. Simply go to the official Metamask website, select your browser, and follow the instructions to install the extension.
Step 2: Create or Import a Wallet
Once you have installed Metamask, you will need to create a new wallet or import an existing one. If you are new to Metamask, click on “Create a Wallet” and follow the prompts to set up a new wallet. If you already have a Metamask wallet, click on the “Import Wallet” option and enter your recovery phrase or private key.
Step 3: Add Shiba Token
After setting up your Metamask wallet, you will need to add the Shiba token to your wallet. To do this, click on the “Assets” tab in the Metamask interface, then click on “Add Token” and select “Custom Token”. In the token contract address field, enter the Shiba token contract address: [insert Shiba token contract address here]. Metamask will automatically fill in the token symbol and decimals of precision for Shiba. Click on “Next” and then “Add Tokens” to add Shiba to your wallet.
Step 4: Manage and Trade Shiba
Now that you have successfully added Shiba to your Metamask wallet, you can easily manage and trade this cryptocurrency. You can view your Shiba balance under the “Assets” tab in Metamask, and use the “Send” or “Receive” options to transfer Shiba to other wallets. If you want to trade Shiba on decentralized exchanges (DEXs), such as Uniswap or Sushiswap, you can connect your Metamask wallet to these platforms and start trading Shiba with ease.
That’s it! You have now learned how to add Shiba to your Metamask wallet. Remember to always be cautious when dealing with cryptocurrencies and make sure to double-check addresses and transactions before confirming. Happy trading!
Setting Up Metamask
Metamask is a cryptocurrency wallet that allows you to interact with decentralized applications (DApps) on the Ethereum network. It’s a browser extension that you can install on Chrome, Firefox, or Brave.
Step 1: Install Metamask
To get started, visit the Metamask website or search for “Metamask” in your browser’s extension store. Click on the “Install” button and follow the guided instructions to add it to your browser.
Step 2: Create an Account
Once Metamask is installed, click on the extension icon in your browser’s toolbar. You will be prompted to create a new account. Choose a strong password and read and accept the terms of use. Click on “Create” to proceed.
Step 3: Back Up Your Seed Phrase
After creating an account, Metamask will provide you with a unique seed phrase. This phrase is crucial for recovering your account if you ever lose access to your device. Make sure to write down the seed phrase and store it in a safe and secure place.
Step 4: Set Up a Password
Next, set up a password to encrypt your Metamask wallet. Choose a strong password that you will remember, but that is difficult for others to guess. Enter the password twice and click on “Confirm” to secure your wallet.
Step 5: Connect to a Network
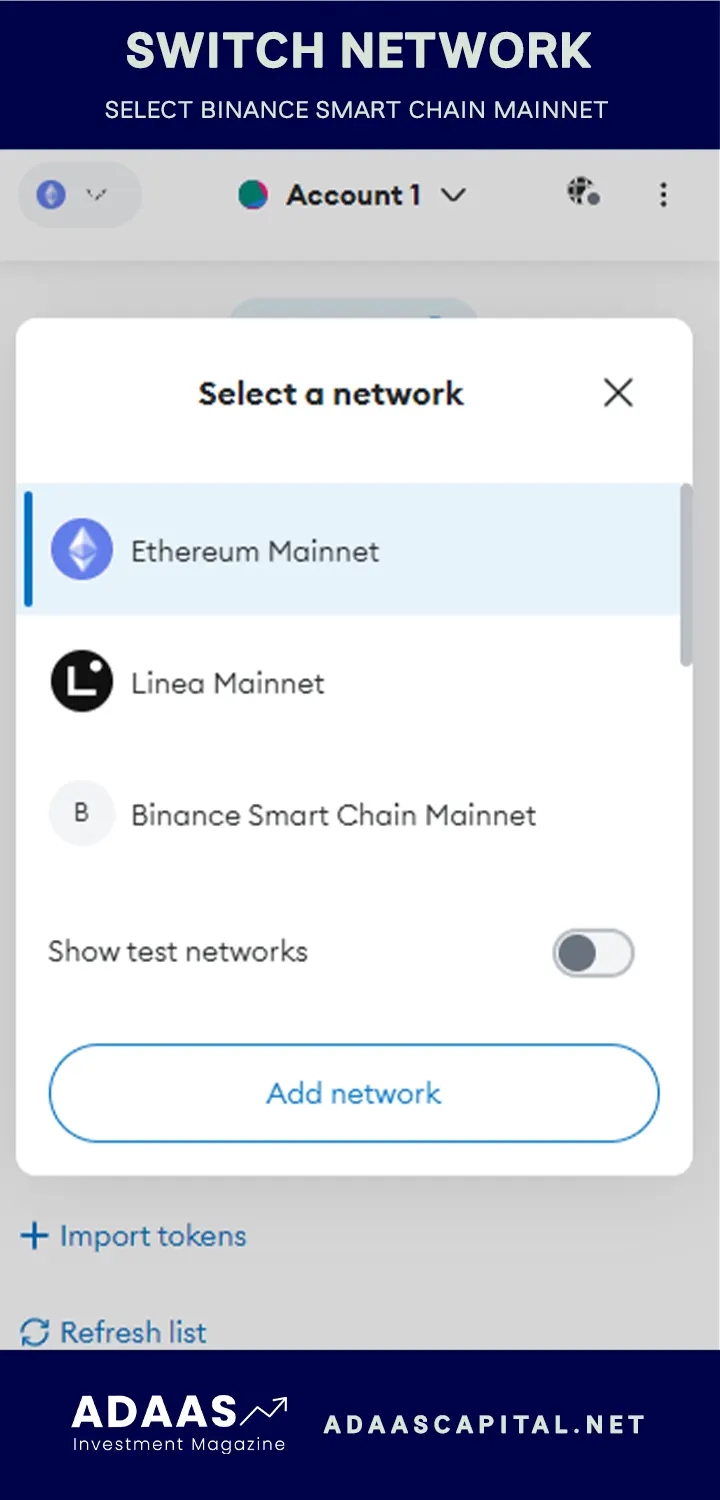
Metamask allows you to connect to different networks. Click on the network dropdown at the top of the Metamask extension and choose the Ethereum Mainnet to use Shiba. If you’re using a test network, you’ll need to switch to the correct network for Shiba.
Congratulations! You have successfully set up Metamask and are ready to add Shiba to your wallet.
Creating a New Wallet
Before you can add Shiba to your Metamask wallet, you need to have a wallet set up. If you don’t already have a wallet, you can create a new one using the following steps:
| 1. | Go to the Metamask website or download the Metamask extension for your browser. |
| 2. | Click on the “Get Started” button. |
| 3. | Read and accept the terms of use. |
| 4. | Create a new password for your wallet. Make sure to use a strong password that you can remember. |
| 5. | Click on the “Create” button. |
| 6. | Metamask will show you a secret backup phrase. This is a very important step, as it will be used to recover your wallet if you ever lose access to it. Write down the backup phrase and store it in a safe place. |
| 7. | Confirm your backup phrase by entering it in the correct order. |
| 8. | Congratulations! You have successfully created a new Metamask wallet. |
Now that you have a wallet set up, you can proceed to add Shiba to your Metamask wallet following the steps in the next section.
Adding Shiba Token
If you are a fan of Shiba Inu and want to add Shiba Token to your Metamask wallet, here is a step-by-step guide to help you through the process:
Step 1: Open Metamask
Make sure you have the Metamask wallet installed on your browser and it is connected to the Ethereum network. If you haven’t installed Metamask yet, follow the official instructions on their website.
Step 2: Open the Metamask wallet
Click on the Metamask extension icon on your browser to open the wallet interface.
Step 3: Go to the “Assets” tab
In the Metamask wallet, click on the “Assets” tab at the top of the interface.
Step 4: Click on “Add Token” button
On the “Assets” tab, scroll down until you find the “Add Token” button and click on it.
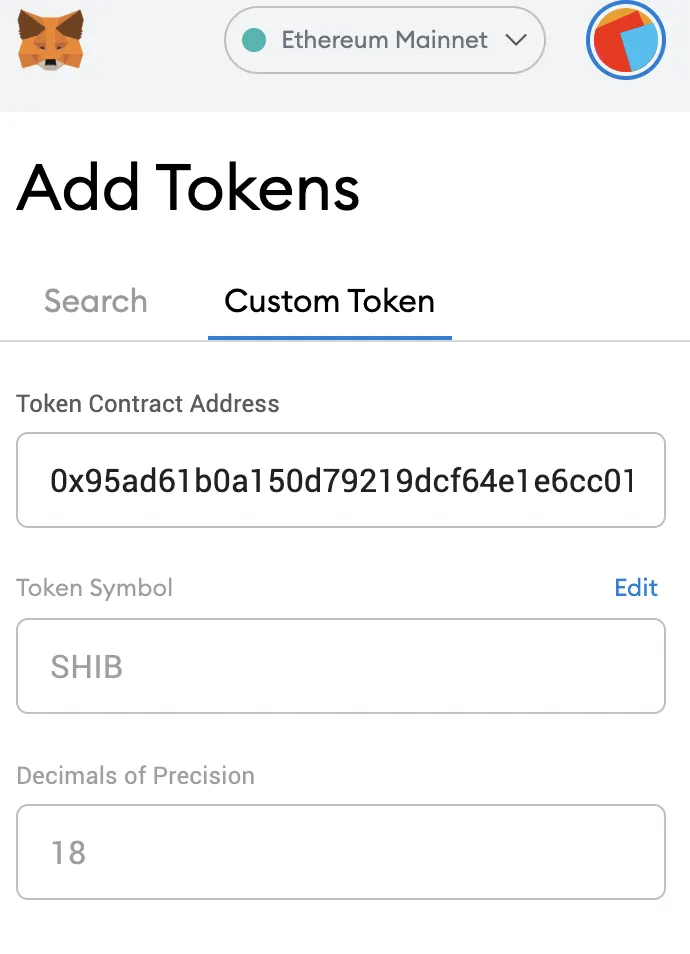
Step 5: Choose “Custom Token” tab
A dialog box will appear with three tabs. Click on the “Custom Token” tab.
Step 6: Enter Shiba Token details
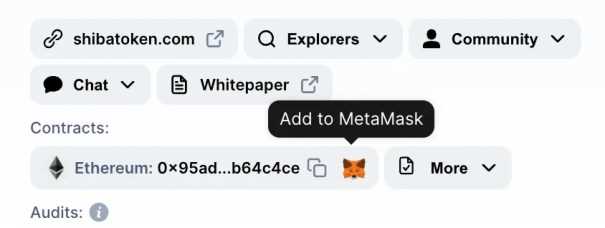
Here, you will need to enter the contract address, token symbol, and decimals of precision for Shiba Token. The contract address for Shiba Token is 0x95ad61b0a150d79219dcf64e1e6cc01f0b64c4ce. The token symbol is SHIB and the decimals of precision is 9.
Step 7: Click on “Next”
After entering the Shiba Token details, click on the “Next” button.
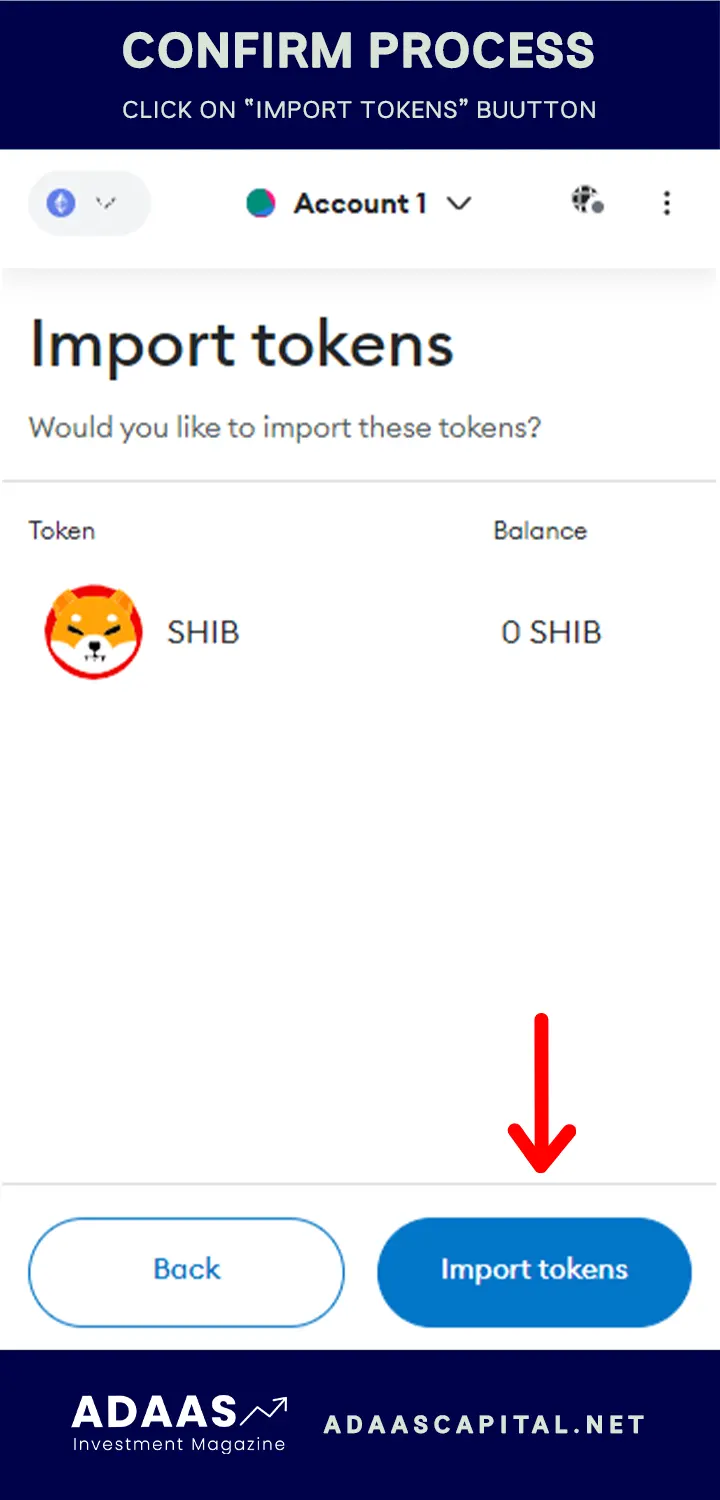
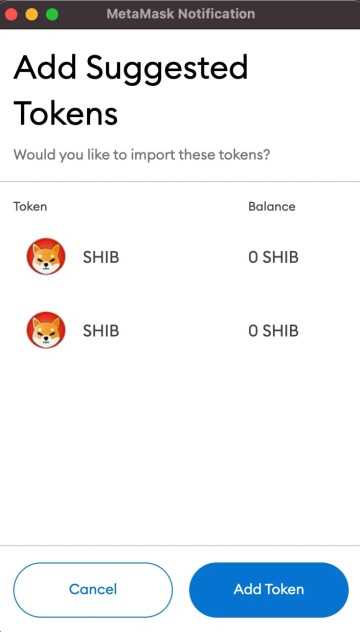
Step 8: Confirm the token addition
A confirmation dialog box will appear asking you to confirm the addition of Shiba Token. Click on the “Add Tokens” button to proceed.
Step 9: Shiba Token added!
Once you click on “Add Tokens”, the Shiba Token will be added to your Metamask wallet. You should now see the token displayed in your wallet interface.
| Contract Address | 0x95ad61b0a150d79219dcf64e1e6cc01f0b64c4ce |
|---|---|
| Token Symbol | SHIB |
| Decimals of Precision | 9 |
Congratulations! You have successfully added Shiba Token to your Metamask wallet. Now you can manage and trade your Shiba Inu tokens with ease.
Connecting to a Decentralized Exchange
Once you have added Shiba to your Metamask wallet, you can connect to a decentralized exchange (DEX) to start trading Shiba. A DEX is a platform that allows users to trade cryptocurrencies directly with one another without the need for intermediaries.
Step 1: Choose a Decentralized Exchange
There are several DEXs available, such as Uniswap, SushiSwap, and PancakeSwap. Each DEX has its own unique features and supported tokens, so it’s important to choose one that aligns with your trading needs.
Step 2: Access the DEX Website
Open your preferred web browser and go to the website of the chosen DEX. Make sure you are visiting the official website to avoid scams or phishing attempts.
Step 3: Connect Metamask to the DEX
On the DEX website, look for a “Connect Wallet” or similar button. Click on it to access the wallet connection options. Select the Metamask option, and a popup window will appear.
Make sure that your Metamask wallet is unlocked and connected to the Ethereum Mainnet or Binance Smart Chain network, depending on the DEX you are using.
Step 4: Allow Access to Metamask
A message will appear in the Metamask popup window asking for your permission to connect your wallet to the DEX. Review the permissions requested and click “Connect” or “Allow” to proceed.
Double-check that the wallet address shown in the popup matches your Metamask wallet address to ensure you are connecting to the correct wallet.
Step 5: Start Trading Shiba
Once your wallet is connected, you can start trading Shiba. Look for the “Swap” or “Trade” button on the DEX website, and select Shiba as the token you want to trade. Enter the desired amount and the token you want to exchange it for.
Review the transaction details and fees before confirming the trade. Once you are satisfied, click on the “Confirm” or “Swap” button to execute the trade.
It’s essential to double-check the transaction details and fees, as transactions on a DEX are irreversible, and any mistakes could result in loss of funds.
Remember to always do your own research and exercise caution when trading cryptocurrencies. DEXs can be highly volatile, and it’s important to stay informed about market conditions and potential risks.
Transferring Shiba Tokens
Once you have successfully added Shiba to your Metamask wallet, you can transfer your Shiba tokens to another wallet or exchange. Here’s how you can do it:
- Open your Metamask wallet and make sure you are on the “Assets” tab.
- Scroll down to find the Shiba token and click on it to select it.
- Click on the “Send” button.
- In the “To” field, enter the address of the recipient’s wallet where you want to send the Shiba tokens.
- Enter the amount of Shiba tokens you want to transfer in the “Amount” field.
- Set the gas fees and transaction speed according to your preference.
- Review the transaction details and make sure everything is correct.
- Click on the “Confirm” button to initiate the transfer.
- Wait for the transaction to be confirmed on the Ethereum network. This may take a few minutes.
- Once the transaction is confirmed, the Shiba tokens will be transferred to the recipient’s wallet.
It’s important to double-check the recipient’s wallet address before confirming the transaction to avoid any loss of funds. Additionally, keep in mind that transferring tokens on the Ethereum network requires paying transaction fees in Ether (ETH).
What is Metamask?
Metamask is a cryptocurrency wallet that allows users to manage and interact with decentralized applications (dApps) on the Ethereum blockchain. It acts as a bridge between users and the Ethereum network, making it easy to send and receive ETH and ERC-20 tokens.
Can I use any other wallet to store Shiba?
Yes, besides Metamask, there are several other wallets that support Shiba and other ERC-20 tokens. Some popular options include MyEtherWallet, Ledger Live, and Trust Wallet. These wallets have similar processes for adding Shiba tokens, but the interface and steps may vary slightly. Make sure to choose a wallet that is compatible with the Shiba network and ERC-20 tokens.
Is it safe to add Shiba to Metamask?
Adding Shiba to Metamask is generally safe as long as you make sure to verify the contract address and use official sources. It’s important to double-check the contract address of the Shiba token before adding it to your wallet to avoid any scams or fake tokens. You can cross-reference the contract address from the official Shiba website or reputable sources. Additionally, ensure that your computer is not compromised by malware or phishing attempts when accessing Metamask or any cryptocurrency-related activities.