
Metamask is a popular Ethereum wallet that allows users to interact with decentralized applications (dApps) on the Ethereum blockchain. By default, Metamask is connected to the Ethereum mainnet, but it also provides support for other networks such as Rinkeby. The Rinkeby network is a public Ethereum test network used by developers to test their dApps before deploying them to the mainnet. If you’re a developer or a user who would like to explore dApps on the Rinkeby network, this step-by-step guide will show you how to add Rinkeby to your Metamask wallet.
Step 1: Install Metamask Extension
If you haven’t already, download and install the Metamask extension for your web browser. Metamask is available for Chrome, Firefox, Brave, and Edge browsers. Once installed, you’ll see the Metamask icon in your browser’s toolbar.
Step 2: Create or Import a Wallet
If you don’t have a Metamask wallet yet, click on the Metamask icon in your browser toolbar and select “Create a Wallet” to create a new wallet. Follow the instructions to set up a password and backup your seed phrase. If you already have a Metamask wallet, click on the Metamask icon and select “Import Wallet” to import an existing wallet using your seed phrase or private key.
Step 3: Open Metamask Settings
Once your wallet is created or imported, click on the Metamask icon and select “Settings” from the dropdown menu. This will open the Metamask settings page.
Step 4: Add Rinkeby Network
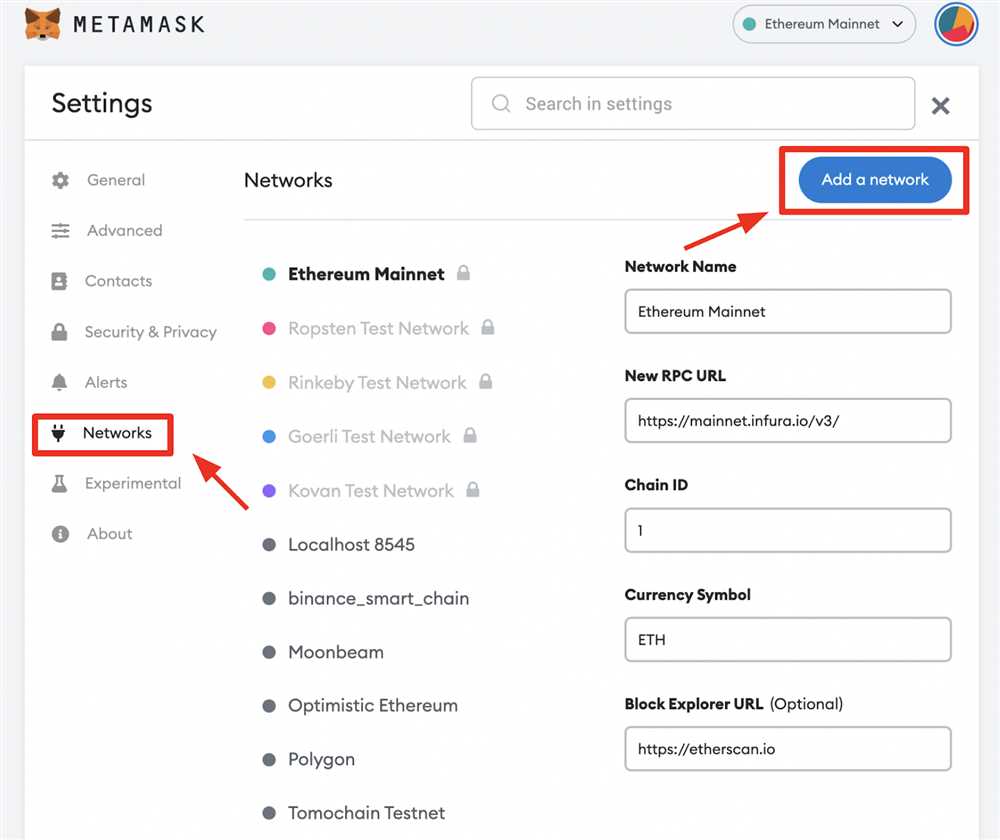
In the settings page, click on the “Networks” tab. Scroll down to the “New Network” section and click on the “Add Network” button. This will open a form where you can enter the details of the Rinkeby network.
Step 5: Fill in Rinkeby Network Details
In the network form, enter the following details for the Rinkeby network:
Network Name: Rinkeby
New RPC URL: https://rinkeby.infura.io/v3/YOUR_INFURA_PROJECT_ID
Chain ID: 4
Currency Symbol: ETH
Block Explorer URL: https://rinkeby.etherscan.io
Replace YOUR_INFURA_PROJECT_ID with your own Infura project ID. If you don’t have one, you can sign up for free at infura.io.
Step 6: Save and Connect
After filling in the network details, click on the “Save” button. Metamask will save the Rinkeby network and connect to it automatically. You can now switch between the Ethereum mainnet and the Rinkeby network by clicking on the network dropdown in the Metamask extension.
Congratulations! You’ve successfully added the Rinkeby network to your Metamask wallet. Now you can explore the world of decentralized applications on the Rinkeby network and test your own dApps before going live on the Ethereum mainnet.
Step-by-Step Guide on Adding Rinkeby Network to Metamask
Metamask is a popular cryptocurrency wallet that allows users to interact with decentralized applications (dApps) on the Ethereum blockchain. By default, Metamask connects to the Ethereum network, but sometimes it’s necessary to add additional networks, such as Rinkeby, for testing or development purposes.
Prerequisites
Before you can add Rinkeby network to Metamask, you need to have Metamask installed and set up on your browser. If you haven’t done this yet, you can easily install Metamask as a browser extension and create a new wallet with a few simple steps.
Step 1: Open Metamask
Click on the Metamask extension icon in your browser’s toolbar to open the Metamask popup window.
Step 2: Access Network Settings
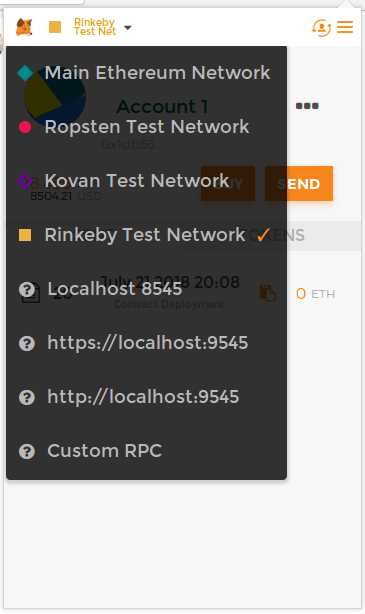
In the Metamask popup window, click on the network dropdown, usually labeled as “Main Ethereum Network” by default.
Step 3: Add Custom RPC Network
In the network dropdown, scroll to the bottom and click on the “Custom RPC” option. This will allow you to add a custom network to Metamask.
Step 4: Configure Rinkeby Network
In the “New RPC URL” field, enter the RPC URL for the Rinkeby network. The RPC URL for Rinkeby is “https://rinkeby.infura.io/v3/YOUR_INFURA_API_KEY”. Replace “YOUR_INFURA_API_KEY” with your own Infura API key. If you don’t have an Infura API key, you can easily create one by signing up on the Infura website.
Set the “Chain ID” field to “4”, which is the unique identifier for the Rinkeby network.
Step 5: Save Network Settings
Click on the “Save” button to save the Rinkeby network settings. Metamask will now connect to the Rinkeby network.
Step 6: Switch to Rinkeby Network
To switch to the Rinkeby network, click on the network dropdown again and select “Rinkeby” from the list of available networks. Metamask will switch to the Rinkeby network and display your Rinkeby account balances and transaction history.
| Network Name | RPC URL | Chain ID |
|---|---|---|
| Main Ethereum Network | https://mainnet.infura.io/v3/YOUR_INFURA_API_KEY | 1 |
| Rinkeby Network | https://rinkeby.infura.io/v3/YOUR_INFURA_API_KEY | 4 |
That’s it! You have successfully added the Rinkeby network to Metamask. Now you can use Metamask to interact with dApps and test your smart contracts on the Rinkeby network.
What is Rinkeby Network?

Rinkeby is one of the test networks of Ethereum, specifically designed for developers to test and deploy smart contracts and decentralized applications (DApps) without using real Ether (ETH).
Test networks are essential for developers, as they provide a safe environment to experiment and ensure that their applications work as intended before deploying them on the main Ethereum network.
Features of Rinkeby Network:
- Faucets: Rinkeby offers a faucet system that allows developers to request test Ether for testing purposes. This ensures that developers have access to sufficient funds to deploy and test their projects.
- High-Level Security: While Rinkeby is a test network, it is still secure. It provides security mechanisms similar to the main Ethereum network, ensuring that developers can test without compromising their applications.
- Active Development Community: Rinkeby has a vibrant developer community. This allows developers to connect with fellow testers and seek help if they encounter any issues during their testing process.
- Fast Block Time: Rinkeby has a fast block time of around 15 seconds. This means that transactions can be confirmed quickly, allowing developers to iterate and test their applications more efficiently.
By adding the Rinkeby network to your MetaMask wallet, you gain access to a dedicated test environment that closely mirrors the main Ethereum network. This allows you to thoroughly test and debug your applications before deploying them to the live blockchain.
Step 1: Download and Install Metamask
To add the Rinkeby network to your Metamask wallet, the first step is to download and install the Metamask extension for your web browser. Follow the instructions below to install Metamask:
Step 1: Open your web browser and navigate to the Metamask website.
Step 2: Click on the “Get Chrome Extension” button if you are using Google Chrome, or “Get Firefox Extension” button if you are using Mozilla Firefox.
Step 3: You will be redirected to the Chrome Web Store or Firefox Add-Ons page. Click on the “Add to Chrome” or “Add to Firefox” button.
Step 4: A pop-up window will appear asking for confirmation to add the extension. Click on “Add extension” to proceed.
Step 5: Once the extension is added, you will see the Metamask icon added to your browser’s toolbar.
Step 6: Click on the Metamask icon to open the extension.
Step 7: Click on the “Get Started” button to begin the setup process.
Step 8: Choose whether you want to import an existing wallet or create a new one. If you are new to Metamask, select “Create a Wallet” and follow the prompts to set up a new wallet.
Note: Make sure to securely store your seed phrase as it is necessary for wallet recovery.
Step 9: Set up a password for your wallet and confirm it. Click on “Create” to finish the setup process.
Step 10: Congratulations! You have successfully downloaded and installed Metamask on your web browser. Your wallet is now ready to use.
Note: It is important to keep your Metamask extension up to date to ensure the latest security features and bug fixes. Check for updates regularly and install them as needed.
Step 2: Create a Metamask Wallet
Before you can start using the Rinkeby network on Metamask, you need to have a Metamask wallet. If you already have a wallet, you can skip this step and proceed to the next one.
Here’s how you can create a Metamask wallet:
Step 1: Install Metamask Extension
If you haven’t installed the Metamask extension for your browser yet, you can do so by visiting https://metamask.io and clicking on the “Get Chrome Extension” or “Get Firefox Add-On” button.
Step 2: Set Up Your Metamask Wallet
Once the extension is installed, you should see the Metamask icon in your browser’s toolbar. Click on it to open the Metamask extension.
Click on the “Get Started” button, then click on “Create a Wallet” and accept the terms of use.
Enter a strong password that you will remember, but make sure it’s not easily guessable by others. Confirm the password.
Metamask will then display a secret backup phrase consisting of 12 random words. Write down this phrase and keep it in a safe place. This is the only way to recover your wallet if you forget your password or lose access to your device.
Confirm the backup phrase by selecting the words in the correct order.
Step 3: Access the Metamask Wallet
Your Metamask wallet is now created. You can access it by clicking on the Metamask icon in your browser’s toolbar.
Enter your password and click on “Unlock”. Your wallet balance and transaction history will be displayed.
Congratulations! You have successfully created a Metamask wallet. Now you’re ready to proceed to the next step and add the Rinkeby network to your Metamask.
Step 3: Switch to Rinkeby Network
Once you have successfully installed Metamask and created a new Ethereum wallet, the next step is to switch to the Rinkeby network. The Rinkeby network is a test network that allows you to interact with smart contracts and test out your dApps without using real Ethereum.
To switch to the Rinkeby network, follow these steps:
1. Open Metamask
Click on the Metamask extension in your browser toolbar to open the Metamask wallet.
2. Select Main Ethereum Network
By default, Metamask is set to the Main Ethereum Network. You need to switch to the Rinkeby network to deploy and interact with smart contracts on the Rinkeby test network.
Click on the network selector dropdown, which is usually set to “Main Ethereum Network”.
Note: If you haven’t connected your wallet to any other network, the dropdown may appear as a circle with a colored stripe.
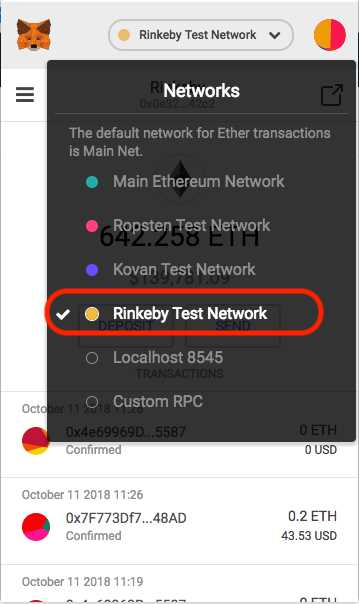
3. Choose Rinkeby Test Network
In the network selector dropdown, scroll down and select “Rinkeby Test Network”.
4. Confirm Switch
A pop-up window will appear asking you to confirm the network switch. Click on “Switch” to switch to the Rinkeby network.
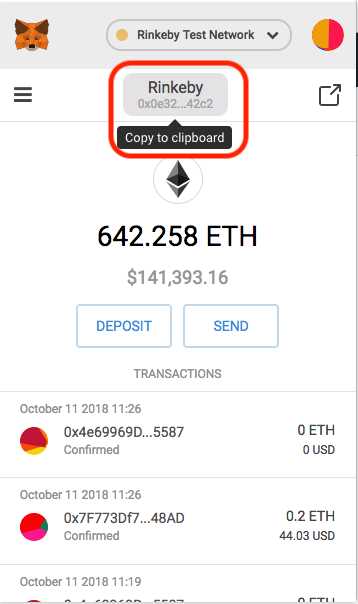
After switching to the Rinkeby network, you will see a different balance and a different set of transactions in your Metamask wallet. This indicates that you are now connected to the Rinkeby network and ready to interact with dApps on the test network.
Remember: Rinkeby network is a test network, so the Ether you hold and the transactions you make on this network are not real, and have no value on the Main Ethereum Network.
Step 4: Get Test Ether from Rinkeby Faucet
Now that you have added the Rinkeby network to your Metamask, it’s time to get some test Ether to use on the network. Rinkeby is a test network that simulates the Ethereum mainnet, and it uses test Ether instead of real Ether.
1. Open the Rinkeby Faucet
To get test Ether, we will use the Rinkeby Faucet, which is a service that provides free test Ether for developers. Open your web browser and go to the Rinkeby Faucet website: http://faucet.rinkeby.io/.
2. Authenticate with a Social Media Account
On the Rinkeby Faucet website, you will see a form that asks for your Ethereum address. Enter your Ethereum address associated with your Metamask wallet. To authenticate that you are a real person and not a robot, you need to connect your social media account. Click on one of the social media buttons (Twitter, Facebook, or Google+) to authenticate yourself.
3. Request Test Ether
After you have authenticated yourself, you can now request test Ether. Enter the amount of test Ether you want to receive in the “Amount to Send” field. Keep in mind that there is a limited supply of test Ether, so don’t request a large amount. A reasonable amount to request is around 1 to 5 test Ether. Click on the “Request 1 ether from faucet” button to submit your request.
Within a few seconds, the Rinkeby Faucet will process your request and send the test Ether to your Metamask wallet. You will receive a notification on the Rinkeby Faucet website once the transaction is complete.
Now that you have test Ether in your Metamask wallet, you can start using it on the Rinkeby network. You can use this test Ether to deploy smart contracts, interact with decentralized applications, and test out various Ethereum functionalities without spending real Ether.
What is Metamask?
Metamask is a cryptocurrency wallet and browser extension that allows users to manage and interact with decentralized applications on the Ethereum blockchain.
Why would I want to add the Rinkeby network to Metamask?
Adding the Rinkeby network to Metamask allows you to interact with decentralized applications deployed on the Rinkeby testnet. This is useful for testing and developing applications without using real Ethereum.
How do I add the Rinkeby network to Metamask?
To add the Rinkeby network to Metamask, first, open your Metamask extension and click on the network dropdown. Then, select “Custom RPC” and enter the following details for the Rinkeby network: Network Name – “Rinkeby”, New RPC URL – “https://rinkeby.infura.io/v3/your-infura-project-id” (replace “your-infura-project-id” with your actual Infura project ID), Chain ID – 4, Currency Symbol – ETH, Block Explorer URL – “https://rinkeby.etherscan.io”. Finally, click “Save” to add the Rinkeby network to Metamask.
Can I switch between networks in Metamask?
Yes, you can switch between networks in Metamask. To do so, simply click on the network dropdown in the Metamask extension and select the desired network from the list.
Is it safe to use the Rinkeby testnet?
Yes, the Rinkeby testnet is safe to use for testing and development purposes. However, it is important to note that the Rinkeby network is a test network, and the Ether tokens on this network have no real-world value.