
If you are a cryptocurrency enthusiast and want to explore the world of decentralized finance (DeFi), then adding Polygon to your Metamask wallet is a crucial step. As one of the most popular layer 2 scaling solutions for Ethereum, Polygon offers faster and cheaper transactions, making it an attractive choice for many users.
Adding Polygon to Metamask is a straightforward process that can be completed in just a few simple steps. In this step-by-step guide, we will walk you through the process of adding Polygon to your Metamask wallet, allowing you to access the growing number of DeFi projects and applications on the Polygon network.
Before we begin, it is important to note that you will need to have the Metamask extension installed in your web browser. If you don’t have it, you can easily download and install it from the official Metamask website. Once you have Metamask installed, you are ready to proceed with adding Polygon to your wallet.
Now let’s get started with the step-by-step guide on how to add Polygon to your Metamask wallet:
Install Metamask Extension
If you haven’t already done so, you will need to install the Metamask extension in your browser. Follow the steps below to install the extension:
Step 1: Go to the Metamask website
Open your preferred web browser and go to the official Metamask website at https://metamask.io/.
Step 2: Add Metamask to your browser
Once you’re on the Metamask website, click on the “Get Chrome Extension” or “Get Firefox Extension” button, depending on your browser of choice.
If you are using a browser other than Chrome or Firefox, you might need to manually download and install the extension from the Metamask GitHub repo.
If prompted, confirm the installation by clicking on the “Add” or “Install” button.
Note: Make sure you only download Metamask from official sources to avoid any malicious software.
Step 3: Create a Metamask wallet
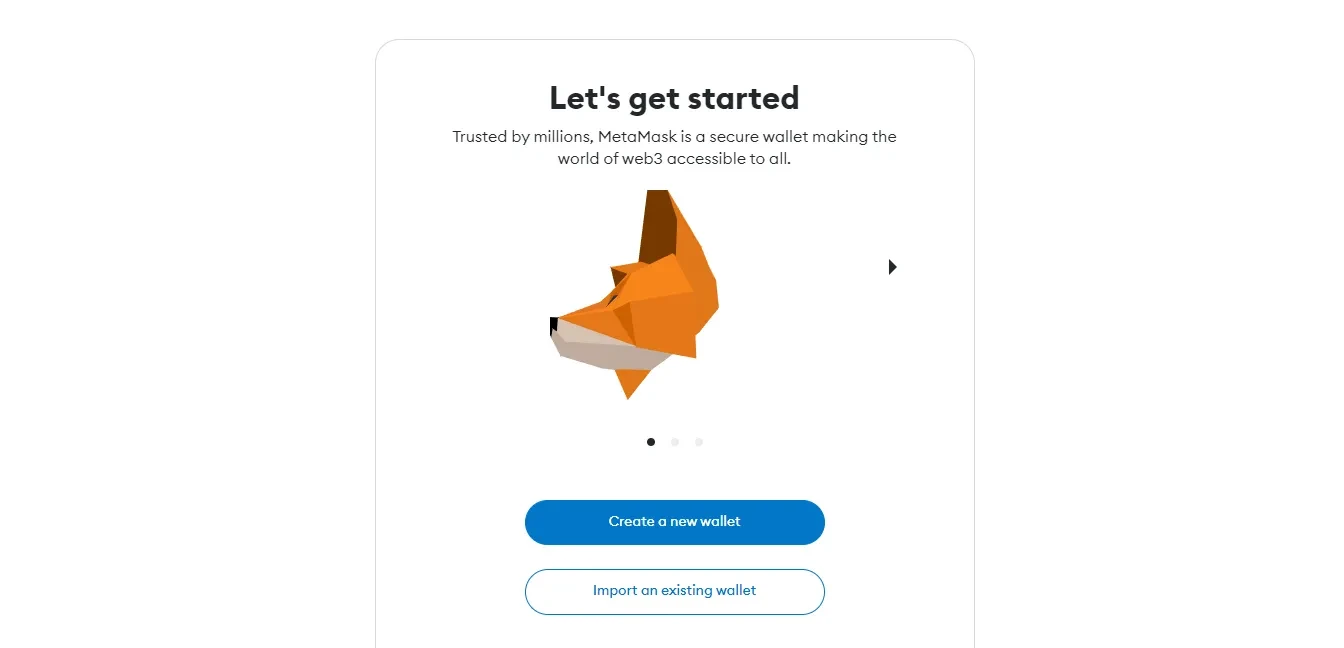
Once the extension is installed, you will see the Metamask icon appear in your browser toolbar. Click on the icon to launch the extension.
A welcome screen will appear, asking you to create a new wallet or import an existing one. If you don’t have a Metamask wallet yet, click on the “Create a Wallet” button.
Follow the prompts to set up a wallet password and save your recovery phrase. This recovery phrase is crucial for restoring your wallet if you ever lose access to it, so make sure to store it in a safe place.
After creating your wallet, the Metamask extension will be ready to use.
Remember: Keep your wallet password and recovery phrase secure and never share them with anyone!
Now that you have successfully installed the Metamask extension and created a wallet, you can proceed to add Polygon to your Metamask account.
Create a Wallet
Before you can add Polygon to your Metamask wallet, you will need to create a wallet if you don’t already have one. Follow these steps to create a new wallet:
- Download the Metamask extension for your preferred browser from the official Metamask website.
- Open Metamask and click on “Create a Wallet” to start the wallet creation process.
- Set a strong password for your wallet and click “Create”. Make sure to choose a password that you will remember, as it will be required each time you want to access your wallet.
- Read and accept the terms of service for Metamask.
- Choose your desired wallet name and click “Next”. This name will help you identify your wallet within your Metamask extension.
- For added security, Metamask will generate a secret backup phrase for you. Write down this phrase and keep it in a safe place. This phrase will be crucial for restoring your wallet in case your device is lost or damaged.
- Confirm your secret backup phrase by typing it into the provided field.
- Congratulations! You have successfully created a wallet with Metamask. Now you are ready to add Polygon to your wallet.
Add Network
To add the Polygon network to your Metamask wallet, follow the steps below:
Step 1: Open Metamask
First, open your Metamask wallet on your browser by clicking on the extension’s icon.
Step 2: Click on the Network Selection
Once the Metamask interface is open, click on the network selection button located at the top of the wallet interface. It is usually labeled as “Ethereum Mainnet” by default.
Step 3: Click on “Custom RPC”

From the network selection dropdown, select the “Custom RPC” option. This will allow you to add custom networks to your Metamask wallet.
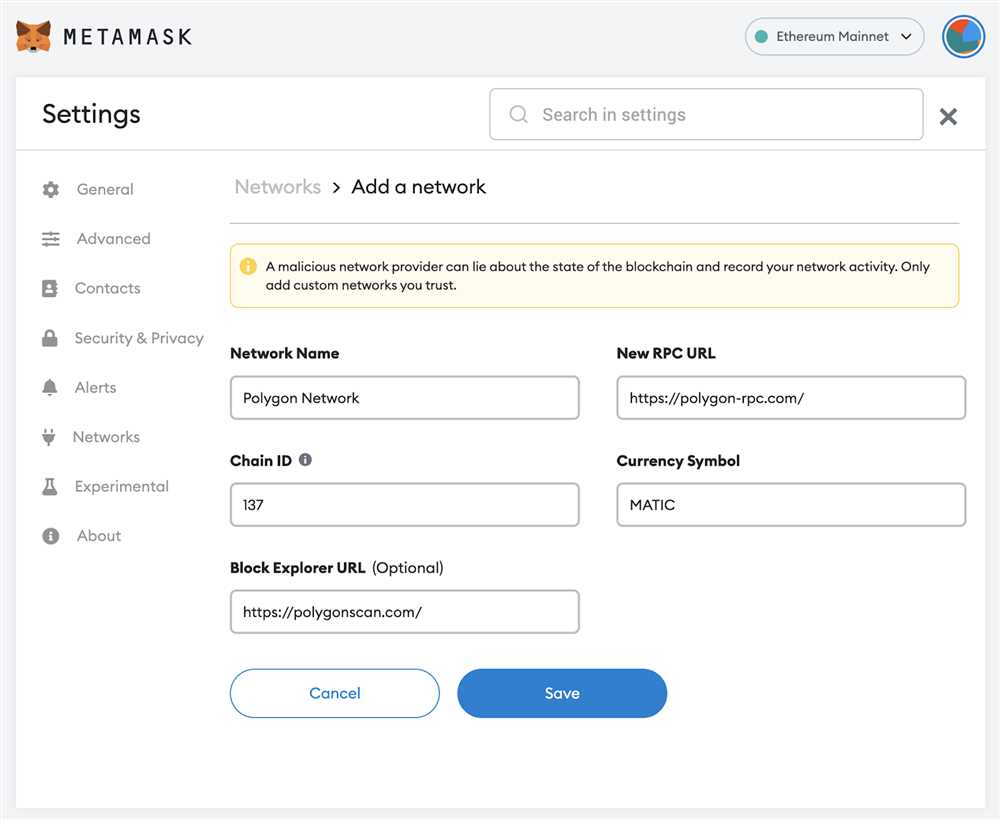
Step 4: Add Polygon Network Details
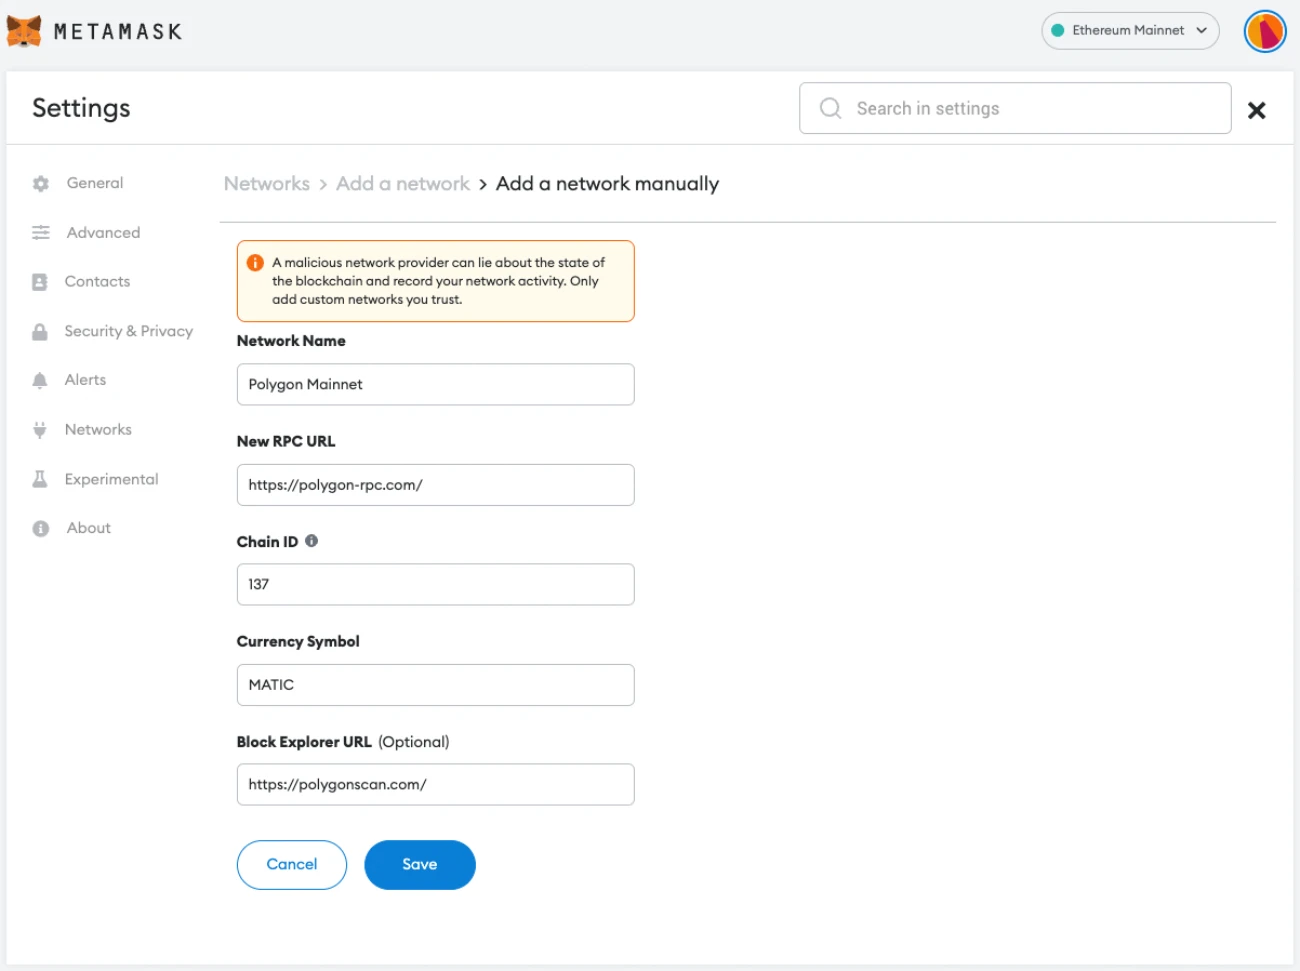
Now, you need to input the specific details of the Polygon network. Fill in the following information:
- Network Name: Polygon Mainnet
- New RPC URL: https://polygon-rpc.com
- ChainID: 137
- Symbol: MATIC
- Block Explorer URL: https://explorer.matic.network
Double-check the information you entered to ensure accuracy.
Step 5: Save and Connect
Once you have entered all the necessary details, click on the “Save” button to save the Polygon network. After saving, click on the network selection button again and this time select “Polygon Mainnet”. Your Metamask wallet should now be connected to the Polygon network.
Congratulations! You have successfully added the Polygon network to your Metamask wallet.
Configure RPC Settings
Once you have installed Metamask in your browser and created a wallet, you will need to configure the RPC (Remote Procedure Call) settings to connect to the Polygon network.
Follow these steps to configure the RPC settings:
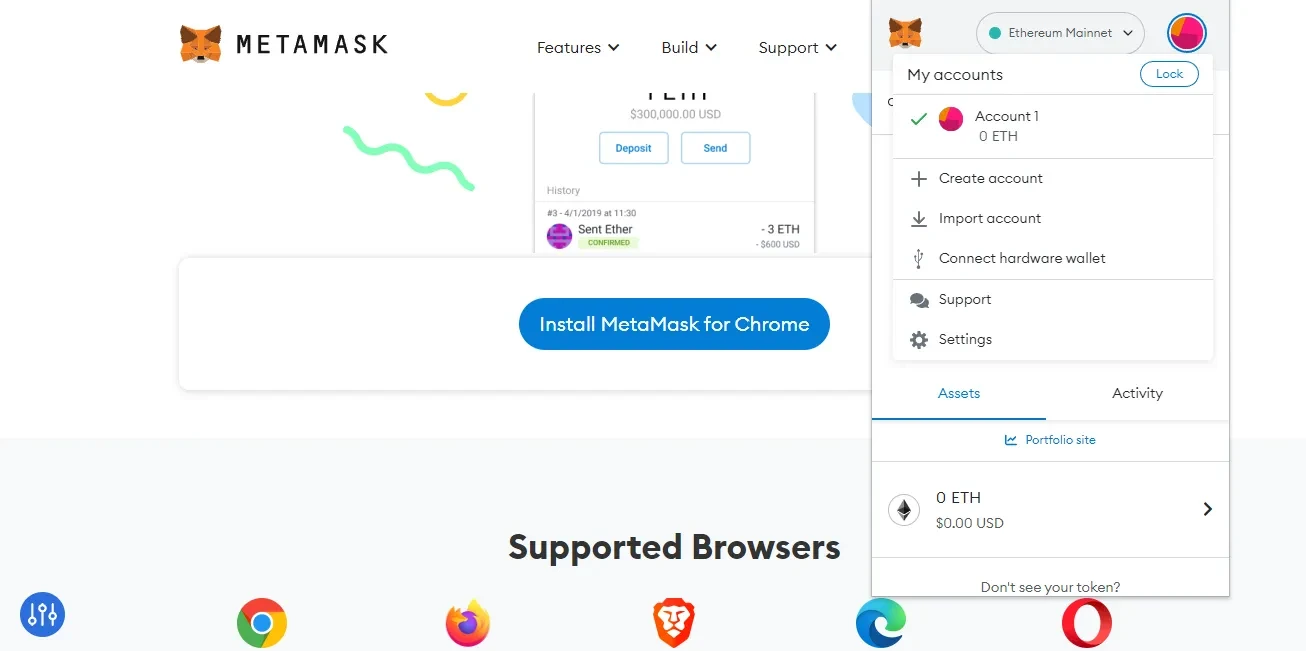
- Open the Metamask extension in your browser.
- Click on the account icon in the top right corner and select “Settings” from the dropdown menu.
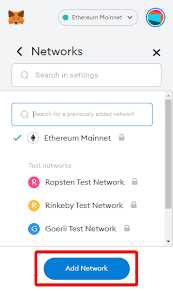
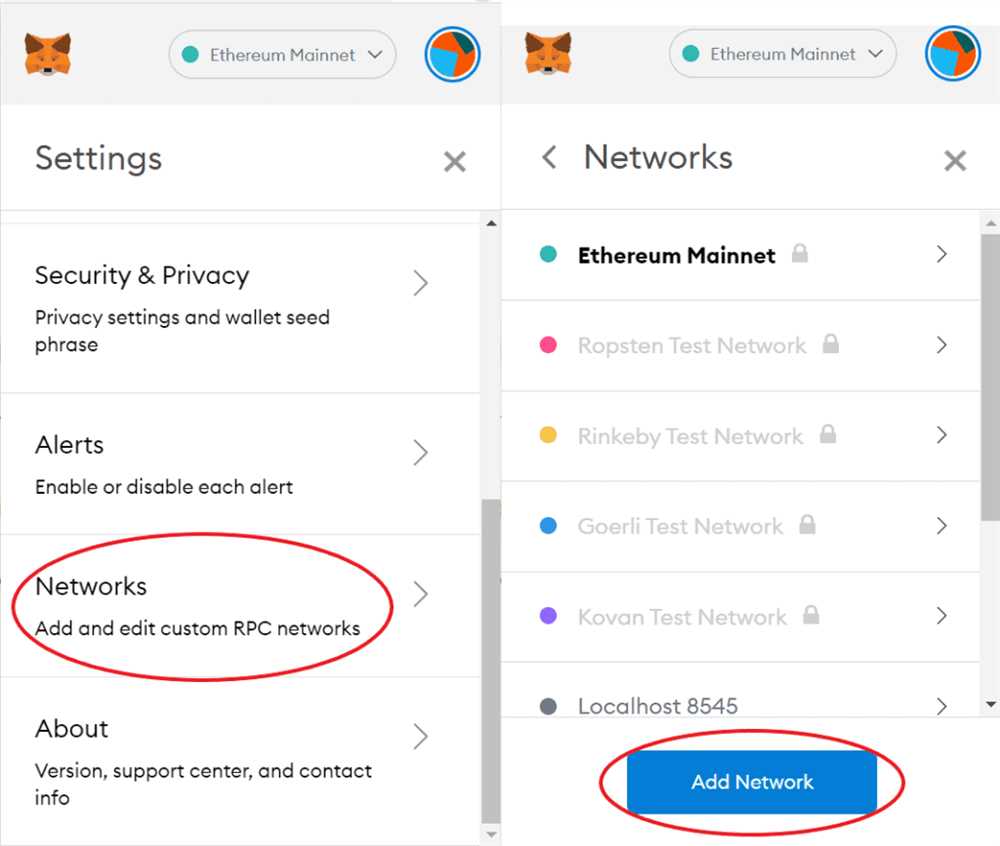
- In the settings menu, click on the “Networks” tab.
- Scroll down and click on the “Add Network” button.
- In the “New Network” section, enter the following information:
- Network Name: Polygon Mainnet
- New RPC URL: https://rpc-mainnet.maticvigil.com/
- Chain ID: 137
- Symbol: MATIC
- Block Explorer URL: https://explorer.matic.network/
Make sure to enter the correct information as listed above.
Click on the “Save” button to save the network settings. Metamask should now be connected to the Polygon network.
You can also repeat the above steps to configure the RPC settings for the Polygon Mumbai Testnet by using the following information:
- Network Name: Polygon Mumbai
- New RPC URL: https://rpc-mumbai.maticvigil.com/
- Chain ID: 80001
- Symbol: MATIC
- Block Explorer URL: https://explorer-mumbai.maticvigil.com/
Once you have successfully configured the RPC settings, you will be able to interact with Polygon dapps and use the Polygon network through your Metamask wallet.
Connect to Polygon
To connect to the Polygon network using MetaMask, follow these steps:
- Open your MetaMask extension in your browser.
- Click on the network dropdown, located at the top of the MetaMask extension.
- Select “Custom RPC” from the network dropdown.
- In the “New RPC URL” field, enter the following URL:
https://polygon-rpc.com/. - Click “Save” to add the Polygon network to your MetaMask.
- Your MetaMask should now be connected to the Polygon network.
Once connected to the Polygon network, you can interact with dapps and use Polygon-based tokens and services.
Switching Networks in MetaMask
If you need to switch between networks in MetaMask, follow these steps:
- Open your MetaMask extension in your browser.
- Click on the network dropdown, located at the top of the MetaMask extension.
- Select the desired network from the network dropdown.
Make sure to double-check that you are connected to the correct network before conducting any transactions.
What is Polygon?
Polygon, previously known as Matic Network, is a Layer 2 scaling solution for Ethereum. It aims to improve scalability and usability on the Ethereum network by offering faster, cheaper transactions and a better user experience. Polygon achieves this by using sidechains and a decentralized network of validators to process transactions off the Ethereum mainnet.
What are the benefits of adding Polygon to Metamask?
Adding Polygon to Metamask allows you to seamlessly interact with decentralized applications (dApps) and use the Ethereum network via the Polygon network. Some benefits of using Polygon include faster transaction confirmations, lower transaction fees, and access to a wide range of dApps and DeFi protocols built on Polygon.
Is it safe to add Polygon to Metamask?
Yes, it is safe to add Polygon to Metamask as long as you follow the official instructions and use the correct network details. Metamask is a trusted and widely used Ethereum wallet, and Polygon is a legitimate Layer 2 scaling solution. However, it is always important to exercise caution and double-check the authenticity of any instructions or links you encounter.
Can I use Metamask on mobile devices to add Polygon?
Yes, you can use Metamask on mobile devices to add Polygon. Metamask has a mobile app available for both iOS and Android. The steps to add Polygon to Metamask on the mobile app are similar to the desktop version. Simply open the app, go to “Settings”, select “Networks”, and add the relevant details for Polygon. Once added, you can switch between different networks, including Polygon, within the Metamask app.