
If you are a developer or a user of the Ethereum blockchain, you may have heard about Ropsten – one of the test networks available for Ethereum. It allows you to test your smart contracts and apps before deploying them on the mainnet. In this step-by-step guide, we will walk you through the process of adding Ropsten to Metamask, a popular Ethereum wallet and browser extension.
Step 1: Install the Metamask Extension
To get started, make sure you have the Metamask extension installed in your web browser. Metamask is available for Chrome, Firefox, and Brave browsers. Visit the official Metamask website or search for it in your browser’s extension store to install it.
Step 2: Create or Import an Ethereum Wallet
Once you have Metamask installed, click on the extension icon in your browser to open the Metamask interface. If you already have a wallet, you can import it using your seed phrase or private key. If you don’t have a wallet yet, you can easily create a new one by following the steps provided by Metamask.
Step 3: Switch to the Ropsten Network
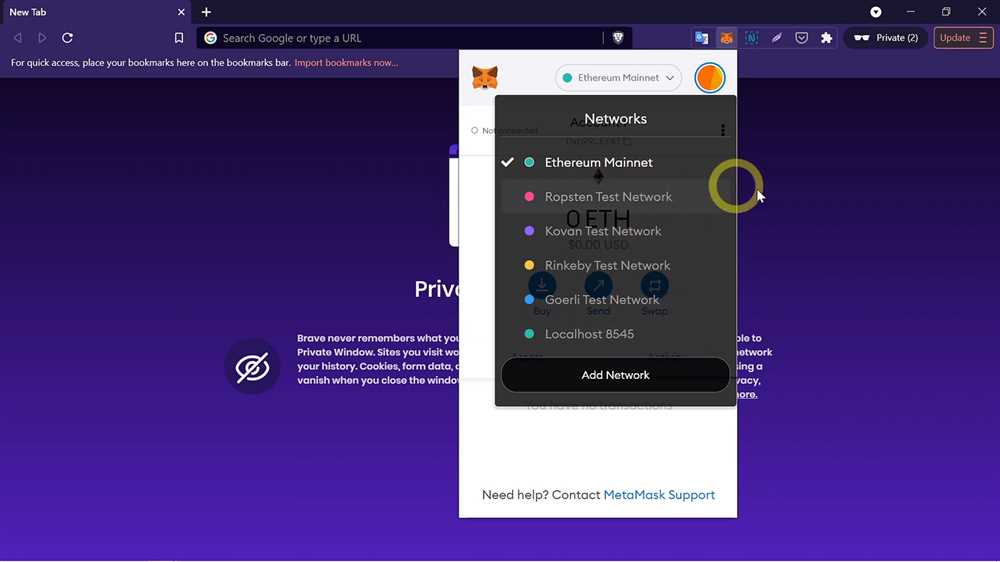
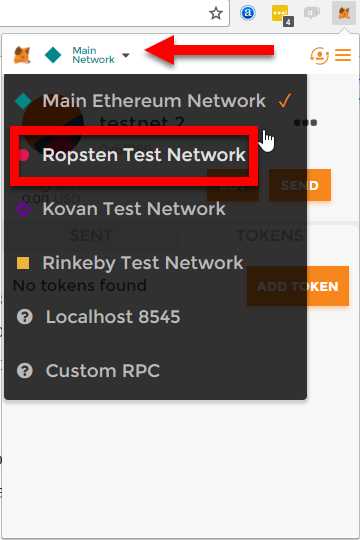
Now that you have an Ethereum wallet in Metamask, it’s time to switch to the Ropsten network. Click on the network dropdown menu at the top of the Metamask interface and select “Custom RPC” at the bottom of the list. This will allow you to add a custom network.
Step 4: Add Ropsten Configuration
In the “New RPC URL” field, enter the Ropsten network configuration. The Ropsten network’s URL is https://ropsten.infura.io/v3/YOUR_INFURA_PROJECT_ID. Replace YOUR_INFURA_PROJECT_ID with your own Infura project ID, which you can obtain by signing up for Infura and creating a project.
Step 5: Save and Connect to Ropsten
After adding the Ropsten configuration, click “Save” to save the changes. You will now see Ropsten as an available network in the network dropdown menu. Select Ropsten from the list to connect to the Ropsten network. You are now ready to interact with the Ropsten network using your Metamask wallet!
Congratulations! You have successfully added Ropsten to Metamask. You can now test your smart contracts and DApps on the Ropsten network without having to spend real Ether. Happy testing!
What is Metamask?
Metamask is a popular cryptocurrency wallet and browser extension that allows users to manage their Ethereum accounts and interact with decentralized applications (dApps) on the Ethereum blockchain. It acts as a bridge between the traditional web browser and the Ethereum blockchain, providing a user-friendly interface for accessing, storing, and transferring digital assets.
Metamask provides users with a secure and convenient way to store and use their cryptocurrencies. It generates and stores private keys locally on the user’s device, allowing them to sign transactions and authenticate themselves without relying on a centralized server. This ensures that the user has full control and ownership over their digital assets.
Metamask also includes a built-in decentralized application (dApp) browser, which allows users to easily access and interact with various dApps on the Ethereum blockchain. Users can browse and use dApps seamlessly, without the need for additional software or plugins.
Metamask is available as a browser extension for popular browsers such as Chrome, Firefox, and Brave. It integrates directly into the browser interface, providing a user-friendly and intuitive experience for managing Ethereum accounts and interacting with dApps.
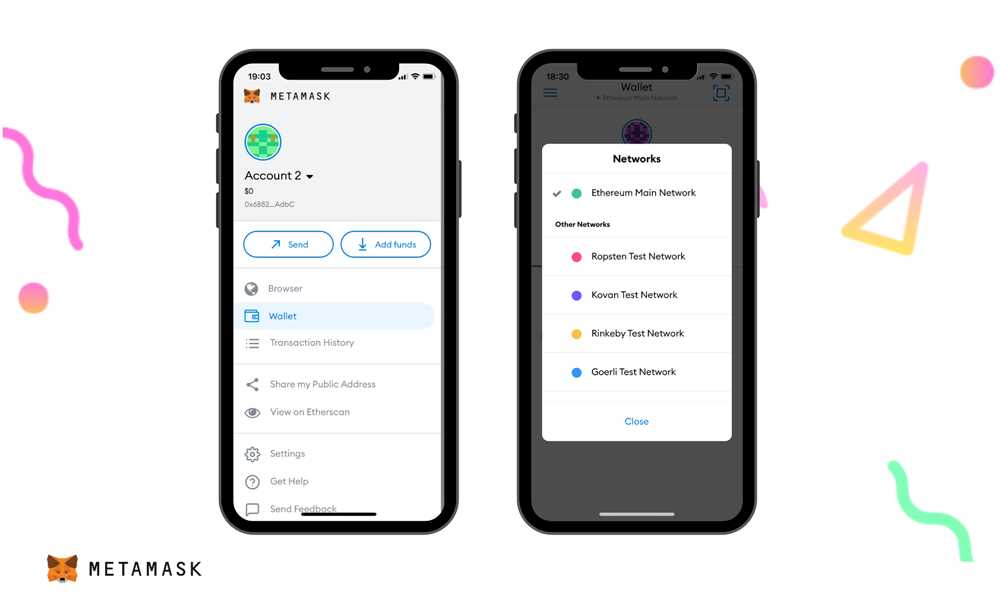
Metamask supports multiple Ethereum networks, including the main Ethereum network and various testnets such as Ropsten, Rinkeby, and Kovan. Users can easily switch between different networks and manage their assets on different chains.
Overall, Metamask has become an essential tool for anyone looking to explore and engage with the world of decentralized finance (DeFi) and the Ethereum ecosystem.
Why Use Ropsten Testnet?
When developing and testing decentralized applications (dApps) on the Ethereum blockchain, it is essential to have a testing environment that replicates the mainnet but without using real money. This is where the Ropsten testnet comes in.
The Ropsten testnet is a public Ethereum test network that allows developers to test their dApps and smart contracts in a real-world-like environment. It closely resembles the Ethereum mainnet, making it an ideal platform for developers to identify and rectify any bugs or vulnerabilities in their code before deploying it to the live network.
Here are a few reasons why you should consider using the Ropsten testnet:
1. Cost-effective Testing
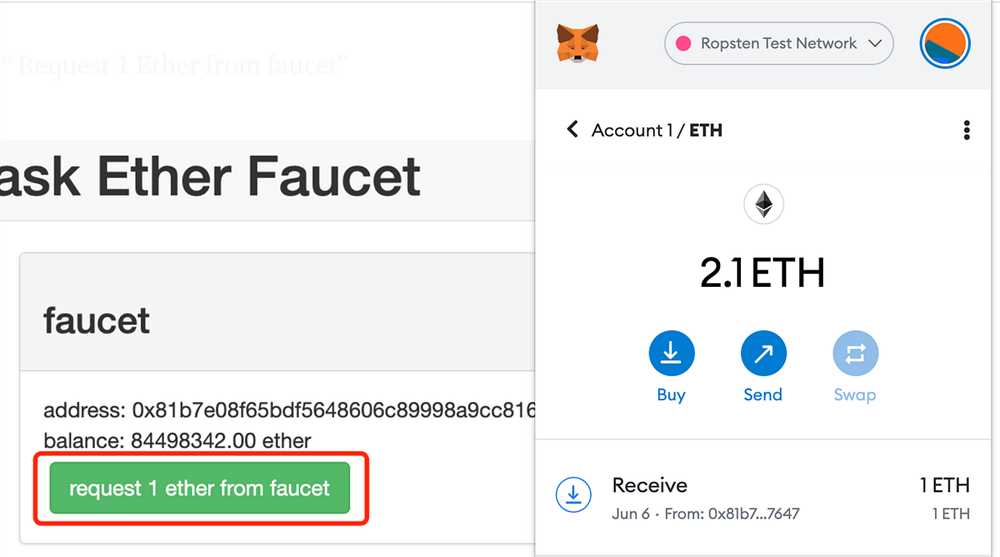
Unlike the Ethereum mainnet, the Ropsten testnet uses test Ether (ETH) instead of real ETH. This means you can freely experiment with your dApps and smart contracts without the risk of incurring any financial losses. You can obtain test Ether from faucet services, which provide free test ETH to developers.
2. Realistic Environment
While using a local development environment is possible, it may not fully replicate the real-world behavior of the Ethereum blockchain. By using the Ropsten testnet, you can test your dApps and smart contracts in an environment that closely mimics the Ethereum mainnet. This allows you to identify and solve any issues or vulnerabilities before deploying your code to the live network.
3. Community Support
Ropsten is a widely used and popular testnet among Ethereum developers. This means there is a large community of developers who are also using the Ropsten testnet. With community support, you can seek help, collaborate, and learn from other developers who are working on similar projects and facing similar challenges.
By using the Ropsten testnet, you can ensure that your dApp or smart contract is thoroughly tested and ready to handle real-world scenarios before deploying it on the Ethereum mainnet. It provides a safe and cost-effective environment for development and testing, helping you to create robust and secure decentralized applications.
Benefits of Using Ropsten Testnet
Ropsten Testnet provides several benefits for developers and users alike:
1. Testing Environment
Ropsten Testnet allows developers to test their smart contracts and decentralized applications (DApps) in a safe and isolated environment. This ensures that any issues or bugs can be identified and fixed before deploying the code on the main Ethereum network. It provides a real-time simulation of the Ethereum network, enabling developers to ensure the functionality and security of their projects.
2. Zero Cost Transactions
Unlike the main Ethereum network, transactions on Ropsten Testnet do not require real Ether, the native cryptocurrency of Ethereum. This allows developers to freely experiment and deploy their smart contracts without any financial constraints. It eliminates the risk of losing real funds during the development and testing process.
3. Fast Block Times
Ropsten Testnet has faster block times compared to the main Ethereum network. This means that transactions are processed more quickly, allowing developers to test their DApps in near real-time. It reduces the waiting time for block confirmation and enables faster iterations during the development process.
4. Community Support and Resources
Ropsten Testnet has a vibrant community of developers and Ethereum enthusiasts. This provides a valuable resource for support, feedback, and collaboration. Developers can engage with the community to seek guidance, share their projects, and get valuable insights from experienced developers. It fosters a collaborative and learning environment for developers working with the Ethereum ecosystem.
- Safe and isolated testing environment
- No cost for transactions
- Faster block times
- Community support and resources
Overall, utilizing Ropsten Testnet enables developers to ensure the stability, security, and functionality of their projects before deploying them on the main Ethereum network. It provides a risk-free environment for testing and experimentation, empowering developers to innovate and build exciting decentralized applications.
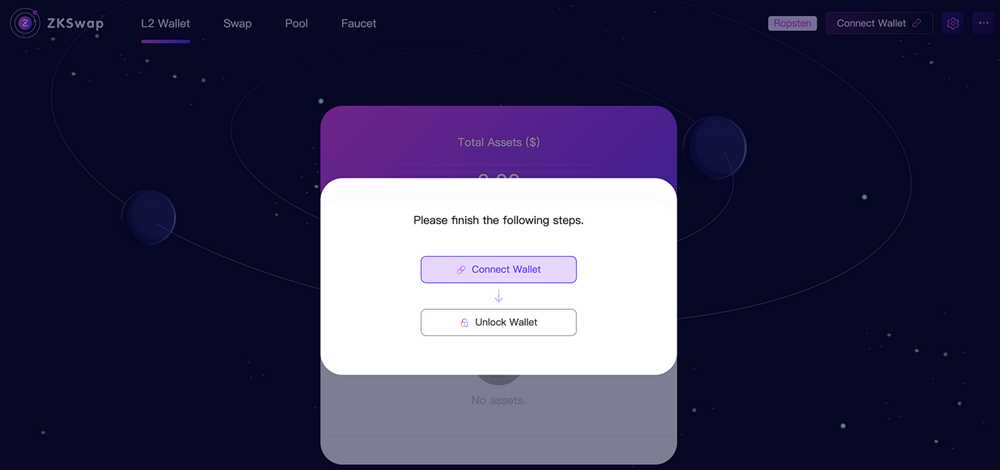
Step-by-Step Guide to Adding Ropsten to Metamask
In order to interact with the Ropsten test network on the Metamask wallet, you will need to follow these steps:
Step 1: Install Metamask
If you haven’t already installed the Metamask wallet extension on your browser, you will need to do so first. Metamask is available for Chrome, Firefox, Brave, and Edge browsers. Simply go to the respective extension store for your browser and search for “Metamask” to install it.
Step 2: Create or Import Wallet
Once you have Metamask installed, open the extension and either create a new wallet or import an existing one using the seed phrase or private key. Make sure to securely backup your wallet information to avoid losing access to your funds.
Step 3: Configure Network
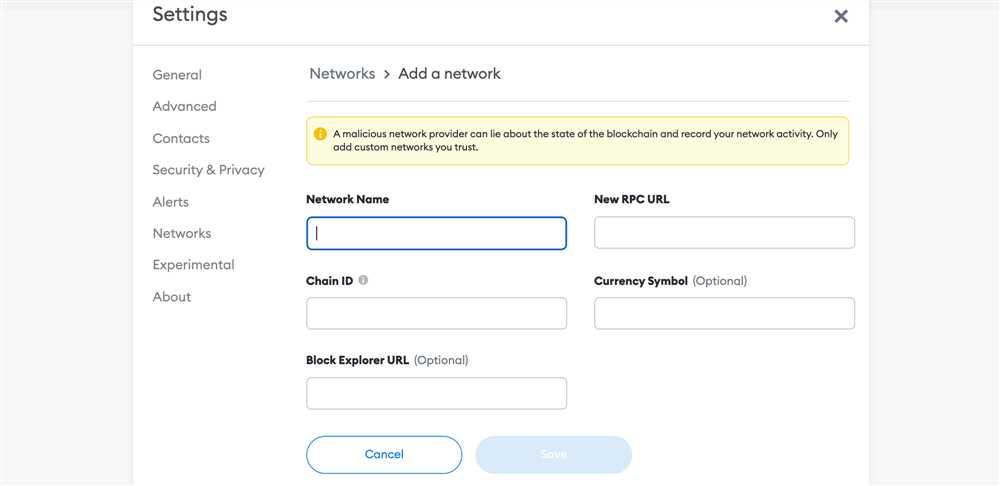
With your wallet created or imported, click on the top right network selection dropdown in Metamask and choose “Custom RPC”. This will allow you to manually configure the network settings.
Step 4: Add Ropsten Network

In the “Custom RPC” section, you will need to fill in the following information:
- Network Name: Ropsten
- New RPC URL: https://ropsten.infura.io/v3/your-infura-api-key
- Chain ID: 3
- Currency Symbol: ETH
Replace “your-infura-api-key” in the URL with your actual Infura API key. If you don’t have one, you can sign up for a free account at infura.io. This API key is necessary to access the Ropsten network.
Step 5: Save and Connect
After filling in the required information, click “Save” to add the Ropsten network to your Metamask wallet. Once saved, you should see the Ropsten network listed in the network selection dropdown. Click on it to connect to the Ropsten network.
That’s it! You have successfully added the Ropsten test network to your Metamask wallet. You can now use it to interact with decentralized applications (dApps) and test out smart contracts on the Ropsten network.
Step 1: Install Metamask Extension
To get started with using the Ropsten test network on Metamask, the first step is to install the Metamask extension on your browser. Metamask is a cryptocurrency wallet and browser extension that allows you to interact with decentralized applications (dApps) built on the Ethereum blockchain.
Step-by-Step Guide
1. Open your browser and go to the Metamask website or search for “Metamask” in your browser’s extension store.
2. Click on the “Install” or “Add to Chrome” button to install the Metamask extension on your browser.
3. Once the extension is installed, you will see a new icon added to your browser toolbar.
4. Click on the Metamask icon to open the extension. You will be prompted to create a new account or import an existing one. Choose the option that suits you and follow the instructions to complete the setup.
5. After setting up your account, you will need to create a password and backup seed phrase. Make sure to store this information in a secure place as it is the key to access your wallet.
6. Once you have set up your account, you can customize your Metamask by adding a profile picture or changing the network settings.
7. To add Ropsten to your Metamask, click on the network dropdown at the top of the extension window and select “Custom RPC”.
8. In the “New RPC URL” field, enter the following URL: https://ropsten.infura.io/v3/your-infura-project-id. Replace “your-infura-project-id” with your Infura project ID.
9. Click “Save” to add the Ropsten network to your Metamask.
10. You are now ready to use the Ropsten test network on Metamask. Make sure to switch to the Ropsten network whenever you want to interact with dApps or test your smart contracts on the Ropsten network.
Note: It is recommended to use the Ropsten network only for testing purposes and not for any real transactions or transfers of value, as it is a test network and not as secure as the main Ethereum network.
Step 2: Create a New Wallet
After installing the MetaMask extension on your browser, you are now ready to create a new wallet:
Step 2.1: Launch MetaMask
Click on the MetaMask icon in your browser’s toolbar to launch it. A pop-up window will appear with the MetaMask logo.
Step 2.2: Set Up Your Wallet
In the MetaMask pop-up window, click on the “Get Started” button to begin setting up your wallet.
You will be presented with two options: “Import Wallet” and “Create Wallet”. Since we are creating a new wallet, choose the “Create Wallet” option.
Step 2.3: Create a Strong Password
Create a strong and unique password for your MetaMask wallet. Make sure to choose a password that is difficult to guess but easy for you to remember. Confirm the password by typing it again in the “Confirm Password” field.
Step 2.4: Back Up Your Seed Phrase
MetaMask will generate a unique 12-word seed phrase that can be used to restore your wallet in case you forget your password or lose access to your account. Write down the seed phrase and keep it in a safe and secure place. Do not share it with anyone.
Click on the checkboxes to confirm that you have written down the seed phrase and that you understand the risk of losing access to your account if the seed phrase is lost or stolen.
Step 2.5: Verify Your Seed Phrase
To verify that you have correctly written down the seed phrase, you will be asked to select the words in the correct order. This is a security measure to ensure that you have properly backed up your seed phrase.
Select the words in the correct order, and then click on the “Verify” button.
Step 2.6: You’re All Set!
Once you have successfully verified your seed phrase, your MetaMask wallet will be created. You will be redirected to the MetaMask dashboard, where you can manage your wallet and interact with the Ropsten test network.
Congratulations! You have successfully created a new MetaMask wallet and are now ready to proceed to the next step.
| Important Reminder: |
|---|
| Remember to never share your seed phrase with anyone. It is the key to your wallet and should be kept secure. |
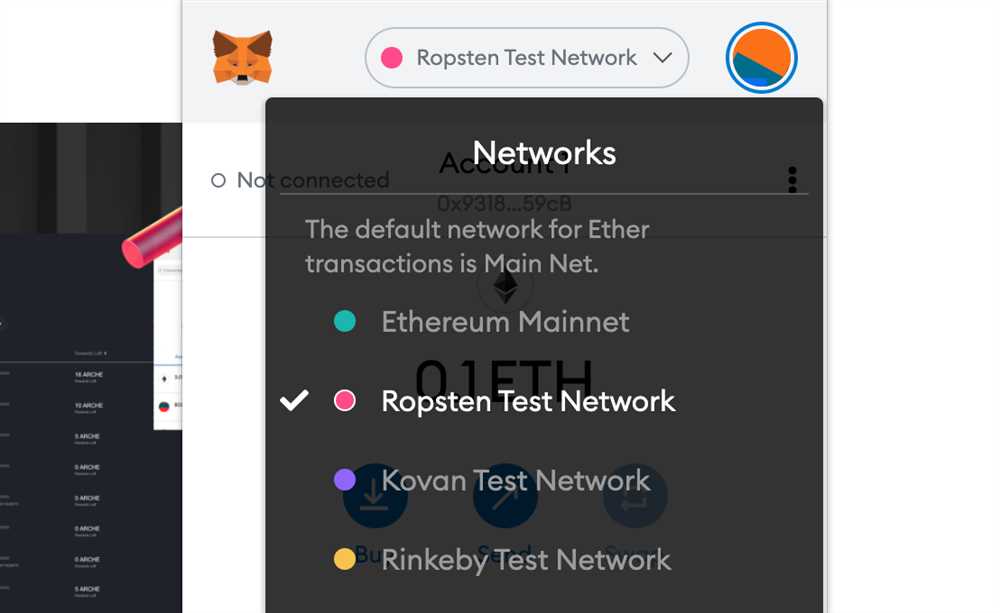
Step 3: Switch to Ropsten Network
Once you have installed and set up the MetaMask extension, the next step is to switch to the Ropsten Network.
1. Open MetaMask
Click on the MetaMask icon in your browser toolbar to open the extension.
2. Sign in and select Main Ethereum Network
If you are not already signed in, enter your password and click on “Unlock”. Then, in the top left corner of the MetaMask window, click on the network dropdown and select “Main Ethereum Network”.
3. Select Ropsten Test Network
After selecting the network dropdown, scroll down and click on “Custom RPC”. A new window will appear where you can enter the details for the Ropsten Test Network.
4. Enter the Ropsten Network Details
In the new window, enter the following details:
- Network Name: Ropsten Test Network
- New RPC URL: https://ropsten.infura.io/v3/YOUR_INFURA_PROJECT_ID
Note: Replace “YOUR_INFURA_PROJECT_ID” with your actual Infura project ID. If you don’t have one, you can sign up for free at https://infura.io/.
5. Save the Network
After entering the details, click on “Save” to save the Ropsten Network to your MetaMask.
6. Switch to Ropsten Network
Finally, in the network dropdown, select the newly added “Ropsten Test Network”. MetaMask will now switch to the Ropsten Network, allowing you to interact with the Ropsten testnet. You can verify that you are on the Ropsten Network by checking the network name in the top left corner of the MetaMask window.
Congratulations! You have successfully switched to the Ropsten Network on MetaMask. You can now proceed with testing your Ethereum dApps and smart contracts on the Ropsten testnet.
What is Ropsten?
Ropsten is a test network for Ethereum that allows developers to test their smart contracts and dapps before deploying them on the main Ethereum network.
Why do I need to add Ropsten to Metamask?
Adding Ropsten to Metamask allows you to interact with the Ropsten test network and test your smart contracts and dapps without spending real Ether.