
Metamask is a popular cryptocurrency wallet that allows users to interact with decentralized applications (dApps) on the Ethereum blockchain. While Ethereum is well-known for its scalability issues and high transaction fees, the Polygon network offers a viable solution. By adding the Polygon network to Metamask, users can benefit from faster and cheaper transactions. In this step-by-step guide, we will show you how to add the Polygon network to your Metamask wallet.
Step 1: Install Metamask
If you haven’t already, the first step is to install the Metamask browser extension. Metamask is available for Google Chrome, Firefox, and Brave browsers. Simply search for Metamask in the browser’s extension store and follow the installation instructions.
Step 2: Create or Import Your Metamask Wallet
Once Metamask is installed, open the extension and follow the prompts to create a new wallet or import an existing one. Make sure to secure your wallet with a strong password and backup your wallet seed phrase.
Step 3: Access the Network Selection
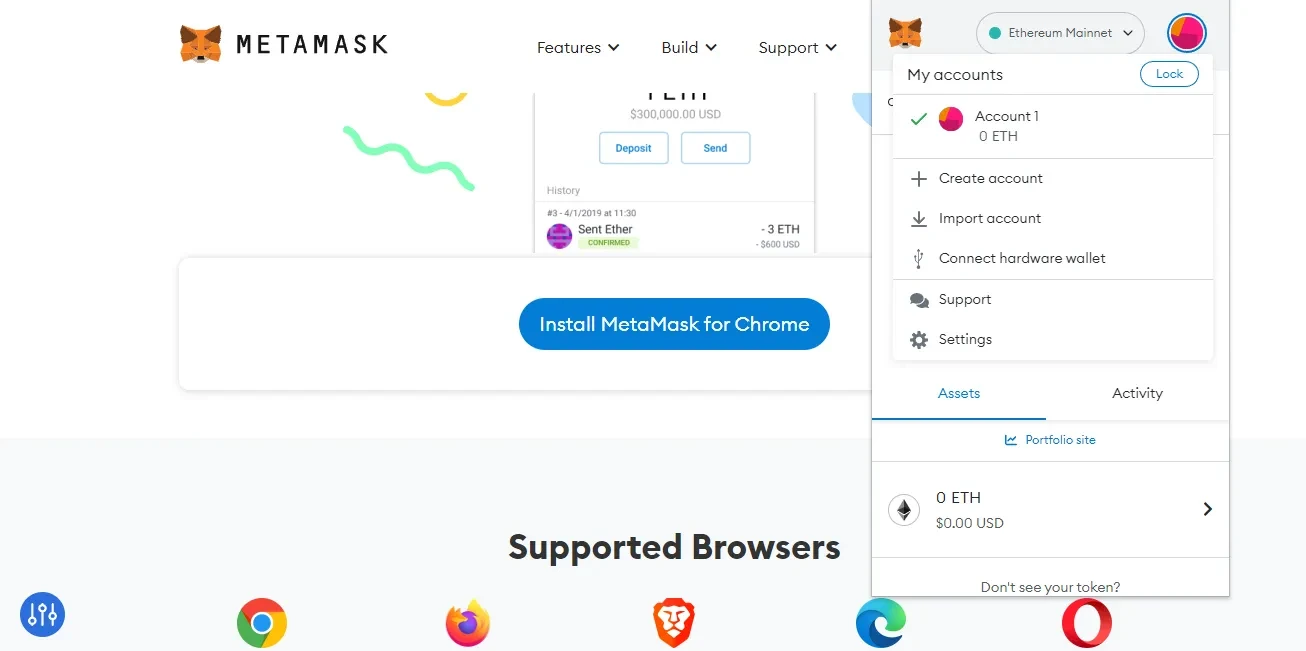
The next step is to access the network selection menu in Metamask. To do this, click on the Metamask extension icon in your browser’s toolbar. In the pop-up window, locate and click on the network name next to the selected Ethereum mainnet.
Step 4: Add Custom Network
In the network selection menu, scroll down until you see the “Custom RPC” option. Click on it to add a custom network.
Step 5: Enter Network Details
In the “New Network” window, enter the following details:
- Network Name: Polygon
- New RPC URL: https://rpc-mainnet.matic.network
- Chain ID: 137
- Symbol: MATIC
- Block Explorer URL: https://explorer.matic.network
Step 6: Save and Select the Polygon Network
After entering the network details, click on the “Save” button. The Polygon network will now appear in the network selection menu. Select the Polygon network to switch your wallet to the Polygon network.
Step 7: Enjoy the Benefits of the Polygon Network
Congratulations! You have successfully added the Polygon network to your Metamask wallet. You can now enjoy faster and cheaper transactions on the Polygon network. Make sure to transfer any desired assets to the Polygon network to take advantage of its benefits.
By following these simple steps, you can easily add the Polygon network to your Metamask wallet and unlock the benefits of this scalable and cost-effective blockchain network.
Step 1: Install Metamask Extension on Your Browser
In order to add the Polygon Network to your Metamask, you first need to have the Metamask extension installed on your browser. Metamask is a popular cryptocurrency wallet and gateway to Ethereum applications that allows you to interact with decentralized finance (DeFi) platforms, including the Polygon Network.
Follow these steps to install Metamask on your browser:
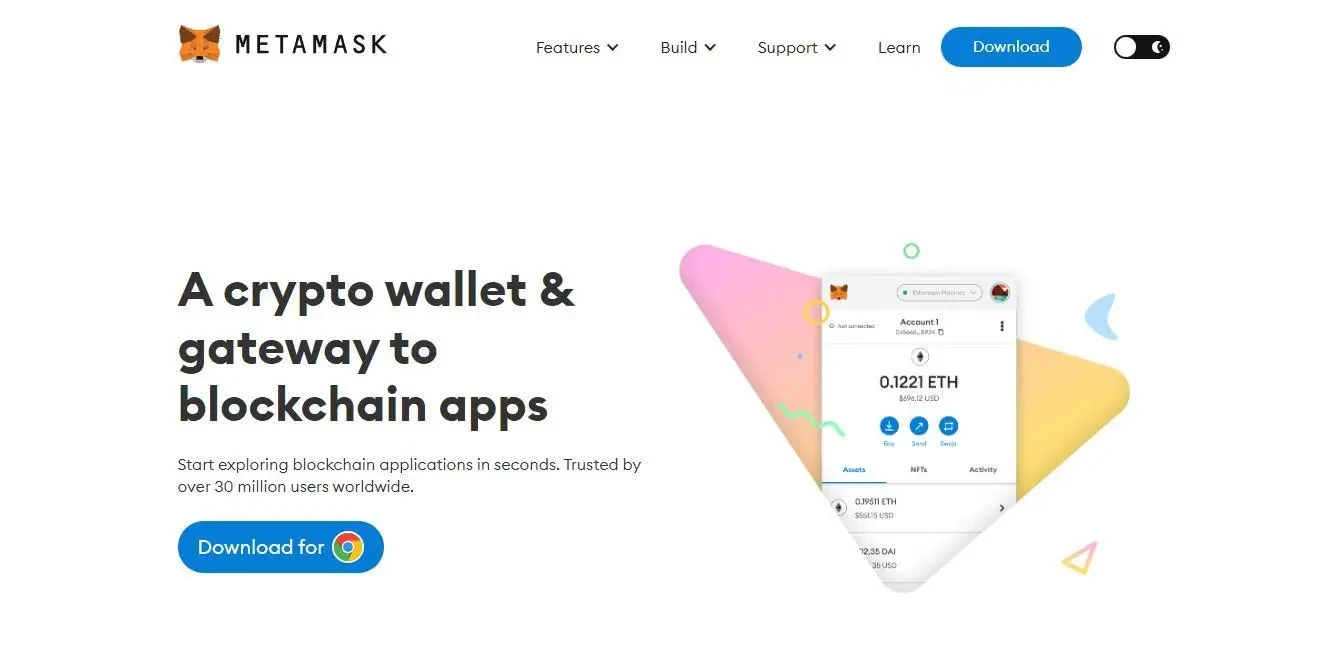
- Open up your web browser (such as Google Chrome) and go to the Metamask website.
- Click on the “Get Chrome Extension” button or the “Get Firefox Add-on” button, depending on your browser.
- A new tab will open in your browser with the Metamask extension page.
- Click on the “Add to Chrome” button or the “Add to Firefox” button, again depending on your browser.
- A pop-up will appear asking if you want to add the extension. Click on the “Add extension” button.
- The Metamask icon will now appear in your browser’s toolbar.
- Click on the Metamask icon, and you will be prompted to create a new wallet or import an existing one.
- Follow the on-screen instructions to set up your wallet and create a password.
- Once your wallet is set up, you will now have access to the Metamask extension and can start adding networks.
Once you have Metamask installed on your browser, you’re ready to move on to the next step: adding the Polygon Network to your Metamask.
Learn how to install Metamask to your browser
Metamask is a popular cryptocurrency wallet and browser extension that allows you to interact with decentralized applications (dApps) securely. It is available for various browsers such as Google Chrome, Firefox, and Brave. Follow the steps below to install Metamask to your browser:
Step 1: Open your browser and go to the Metamask website
Open your preferred browser and navigate to the official Metamask website at https://metamask.io.
Step 2: Click on the “Get Chrome Extension” button
Once you’re on the Metamask website, locate the “Get Chrome Extension” button and click on it. If you’re using a different browser, there will be a separate button for that browser.
Step 3: Add the Metamask extension to your browser
After clicking on the “Get Chrome Extension” button, you will be redirected to the respective extension store for your browser. Click on the “Add to Chrome” button (or the equivalent for your browser) to add the Metamask extension to your browser.
Note: You may need to grant necessary permissions for the extension to function properly.
Step 4: Set up your Metamask wallet
Once the Metamask extension is added to your browser, you will see the Metamask fox icon added to your browser toolbar. Click on the icon to launch Metamask.
Follow the on-screen instructions to set up your Metamask wallet. This includes creating a new wallet, setting a password, and agreeing to the terms of service.
Note: It is important to securely store and backup your wallet’s seed phrase, as it is your access to your funds. Make sure to follow the recommended security practices.
Congratulations! You have successfully installed Metamask to your browser. Now you can use Metamask to interact with decentralized applications and manage your cryptocurrencies.
Step 2: Create a Metamask Wallet
To add Polygon Network to your Metamask, you first need to have a Metamask wallet. If you already have a Metamask wallet, you can skip this step and proceed to the next. If you don’t have a Metamask wallet, follow the steps below to create one:
- Go to the Metamask website at https://metamask.io/.
- Click on the “Get Chrome Extension” button or “Get Firefox Extension” button, depending on your web browser.
- Follow the prompts to add the Metamask extension to your web browser.
- Once the extension is added, click on the Metamask icon that appears in the top-right corner of your web browser.
- Click on “Create a Wallet” and then click on “I Agree” to accept the terms and conditions.
- Choose a strong password for your wallet and click on “Create” to create your wallet.
- You will be provided with a secret backup phrase. Make sure to write this down and keep it in a safe place. This backup phrase can be used to recover your wallet if you ever forget your password.
- Confirm your backup phrase by selecting the words in the correct order.
- Your Metamask wallet is now created and ready to use!
Once you have successfully created your Metamask wallet, you can proceed to the next step to add Polygon Network to your Metamask.
Discover how to set up a new wallet on Metamask
If you are new to cryptocurrency or looking to explore different networks, setting up a new wallet on Metamask is a great place to start. Metamask is a popular Ethereum wallet that allows you to easily manage your digital assets and interact with decentralized applications (dApps). In this step-by-step guide, we will walk you through the process of setting up a new wallet on Metamask.
Step 1: Install Metamask

The first step is to install the Metamask extension on your web browser. Metamask is available for Google Chrome, Firefox, and Brave browsers. Simply search for “Metamask” in your browser’s extension store and install it.
Step 2: Create a New Wallet
Once you have installed Metamask, click on the extension icon in your browser’s toolbar. You will be prompted to create a new wallet. Click on the “Create a Wallet” button to proceed.
Metamask will generate a unique 12-word recovery phrase that you must write down and store in a safe place. This recovery phrase is crucial for regaining access to your wallet in case you forget your password or lose access to your device.
After writing down the recovery phrase, click on “Next” and Metamask will ask you to confirm the order of the words. This is to ensure that you have correctly written down the recovery phrase. Once confirmed, click on “Confirm” to proceed.
Step 3: Set a Password
In this step, you will be asked to set a password to secure your wallet. Choose a strong password that includes a combination of uppercase and lowercase letters, numbers, and special characters. Remember to make it unique and difficult to guess. After setting your password, click on “Create” to create your wallet.
Step 4: Access Your Wallet
Once your wallet is created, you will be directed to the main Metamask interface. From here, you can access your wallet address, view your account balance, and manage your digital assets.
To access your wallet in the future, simply click on the Metamask extension icon in your browser’s toolbar and enter your password. Make sure to keep your password secure and do not share it with anyone.
Step 5: Importing an Existing Wallet
If you already have an existing wallet, you can import it into Metamask instead of creating a new wallet. To do this, click on the Metamask extension icon, select “Import Wallet”, and follow the prompts to import your wallet using your recovery phrase or private key.
| Pros of using Metamask | Cons of using Metamask |
|---|---|
| 1. Easy to install and set up | 1. Limited support for other cryptocurrencies |
| 2. User-friendly interface | 2. Reliance on a third-party extension |
| 3. Secure storage of private keys | 3. Potential for phishing attacks |
| 4. Wide range of dApps supported | 4. Requires an internet connection |
Now that you have set up a new wallet on Metamask, you can start exploring the world of decentralized finance and interacting with various dApps. Remember to always exercise caution and do thorough research before making any transactions or investments.
Step 3: Add Polygon Network to Metamask
Adding the Polygon network to your Metamask wallet is a straightforward process. Follow the steps below:
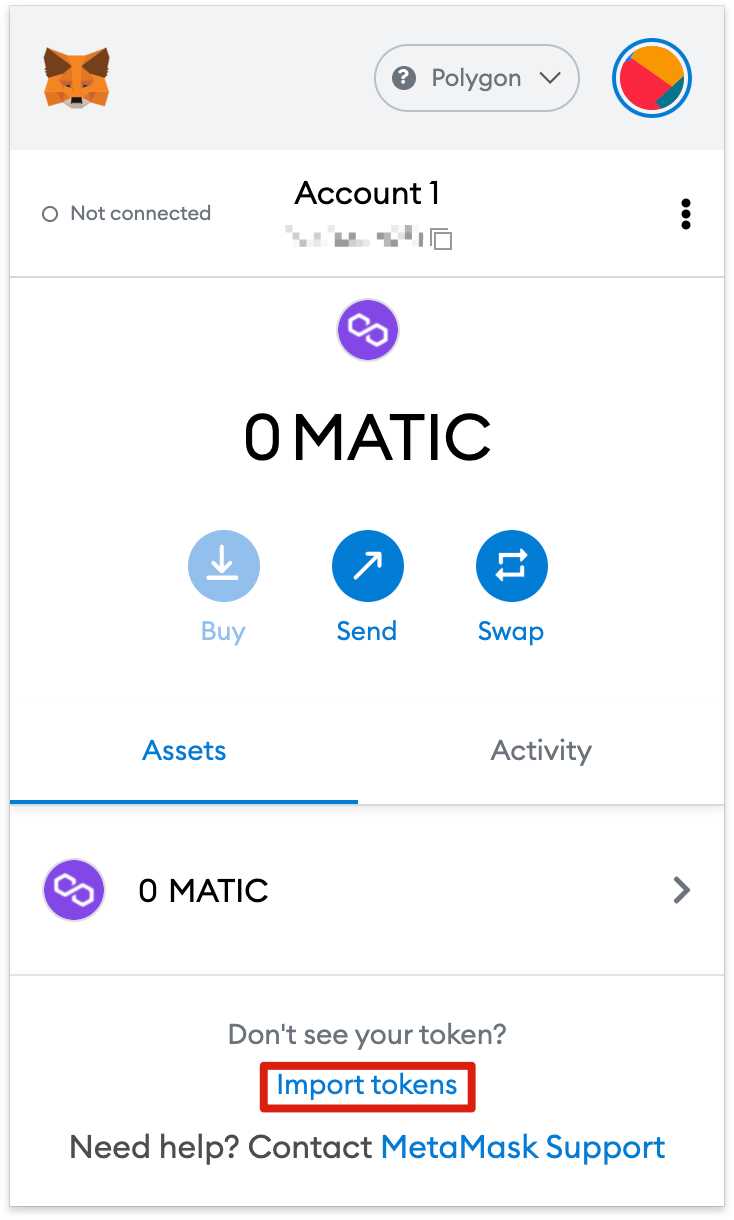
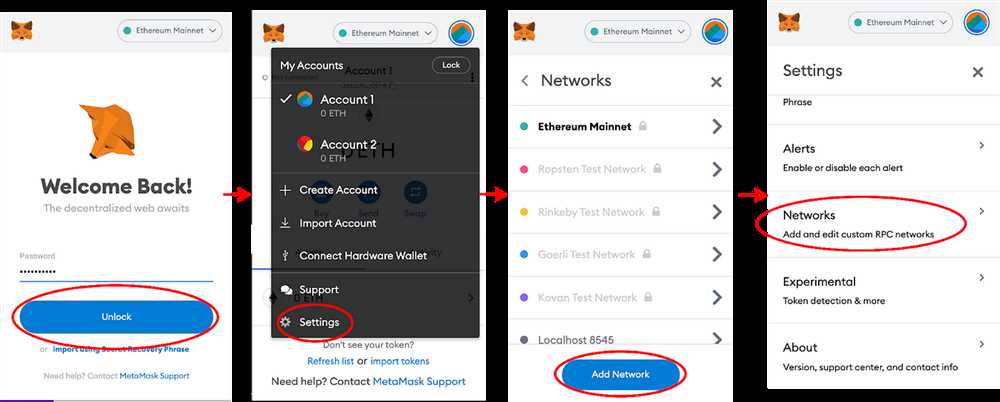
- Open your Metamask extension in your browser and click on the account icon at the top right corner of the screen.
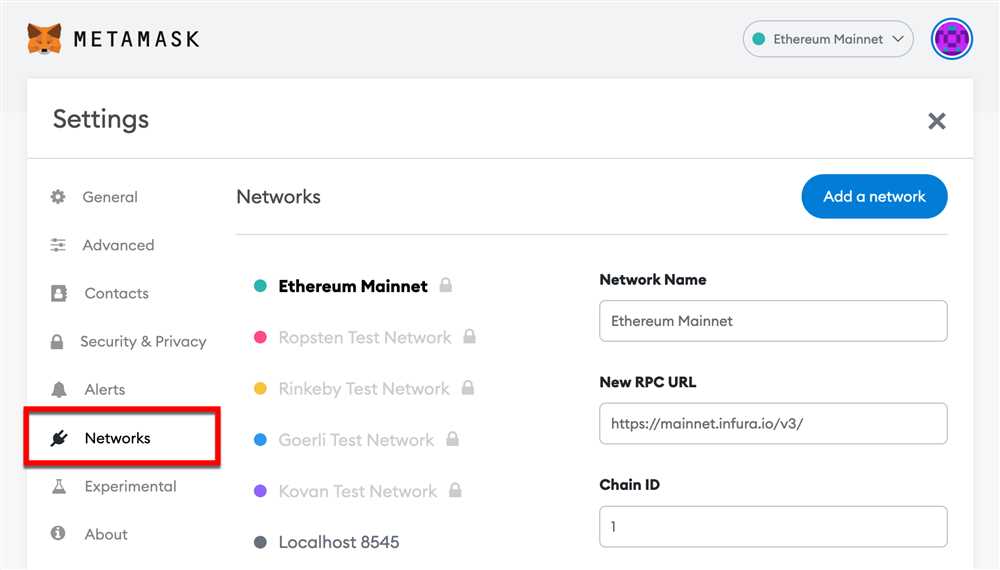
- A dropdown menu will appear. Click on “Settings” at the bottom of the menu.
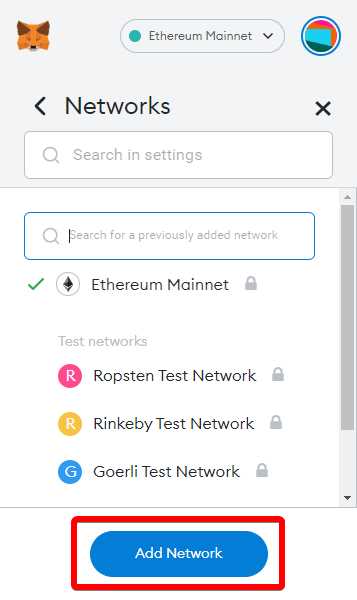
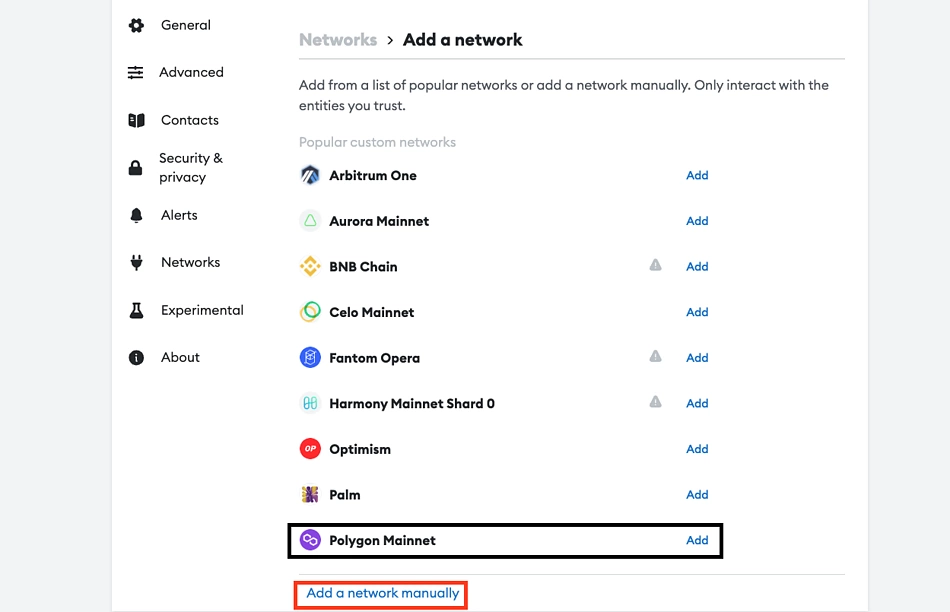
- In the settings menu, click on “Networks” located on the left-hand side.
- Scroll down and click on “Add Network” to add a new network.
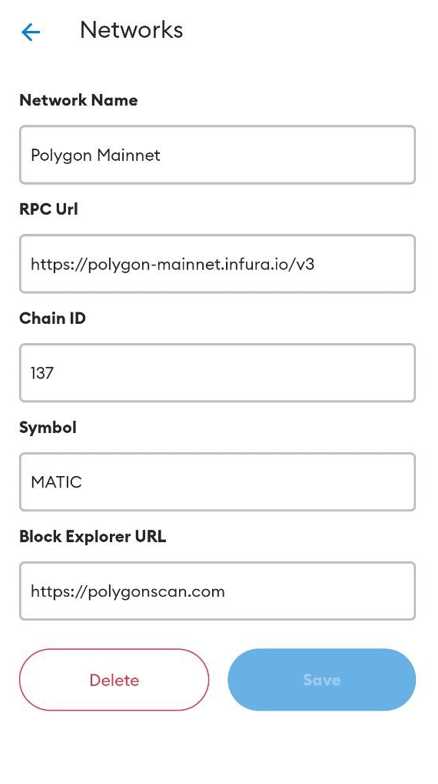
- A form will appear where you can enter the network details. Fill in the following information:
- Network Name: Polygon Mainnet
- New RPC URL: https://rpc-mainnet.matic.network
- ChainID: 137
- Symbol: MATIC
- Block Explorer URL: https://polygonscan.com
- After filling in the details, click on “Save” to add the Polygon network to your Metamask wallet.
- Congratulations! You have successfully added the Polygon network to your Metamask wallet.
Now you can easily switch between different networks in your Metamask wallet and interact with dApps and tokens on the Polygon network.
What is Polygon Network?
Polygon Network, previously known as Matic Network, is a layer 2 scaling solution for Ethereum. It aims to provide a faster and cheaper transaction experience for users, making decentralized applications more accessible.
Why should I add Polygon Network to Metamask?
By adding the Polygon Network to your Metamask, you can access and interact with decentralized applications built on the Polygon Network. It allows you to take advantage of the benefits of Polygon, such as low fees and fast transactions.
Is it safe to add Polygon Network to Metamask?
Adding the Polygon Network to Metamask is generally safe, as long as you use the correct RPC URL and settings. It’s important to double-check the details before adding a new network to ensure you are connecting to the correct blockchain. Being cautious and verifying the information can help prevent any potential security risks.
What are the advantages of using Polygon Network on Metamask?
Using the Polygon Network on Metamask offers several advantages. Some of the key benefits include faster transaction speeds, lower fees compared to the Ethereum mainnet, and access to a wide range of decentralized applications built on the Polygon Network. Additionally, by using Polygon, you can enjoy a more scalable and efficient Ethereum ecosystem.